

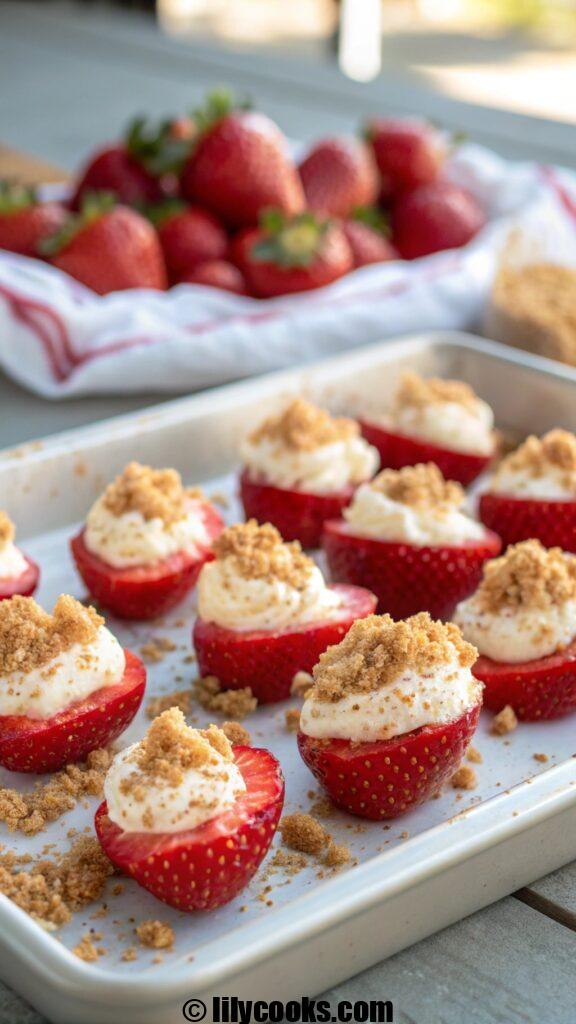
Bite into the juicy sweetness of deviled strawberries, a delightful dessert that combines fresh, ripe berries with a luscious cream cheese filling.
This no-bake recipe is perfect for summer gatherings, brunches, or a quick indulgence. Its vibrant flavors and creamy texture make it a crowd-pleaser, and readers will love how fast and easy it is to whip up a stunning treat.
Recipe Overview
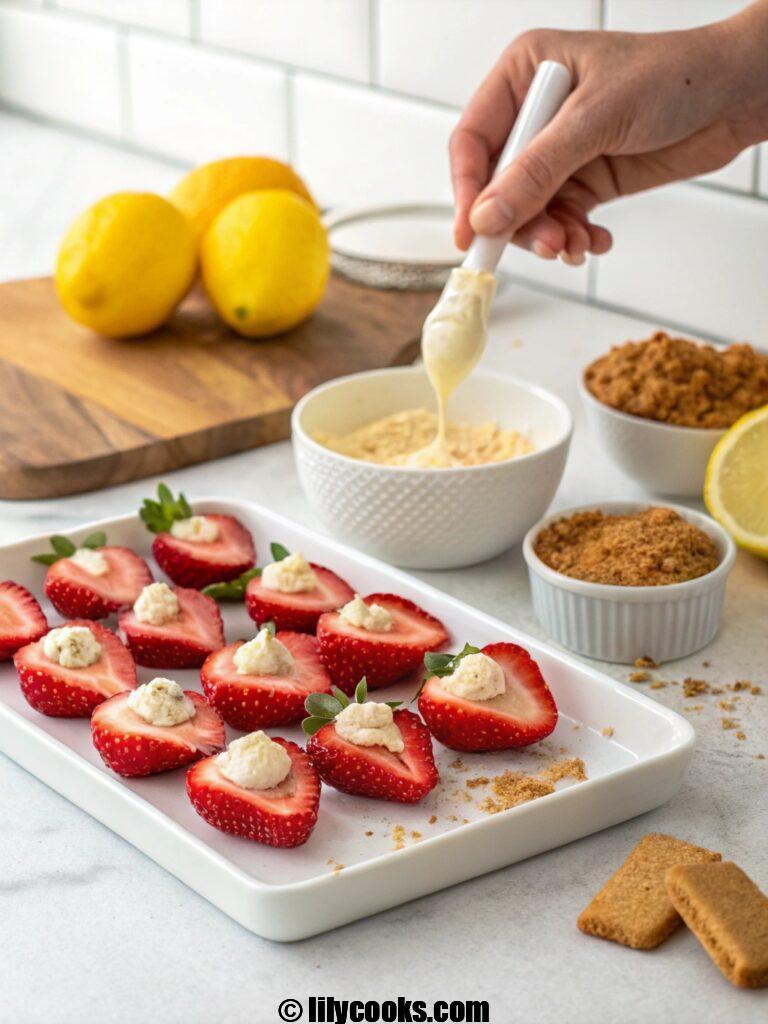
Deviled strawberries are a fresh, fruity dessert with a velvety cream cheese filling piped into juicy strawberry halves. Ready in just 20 minutes, this no-cook recipe is beginner-friendly and bursts with sweet-tart flavor. It’s versatile, perfect for parties or a light after-dinner treat.
Preparation Time: 20 minutes
Cooking Time: 0 minutes
Total Time: 20 minutes
Ingredients List
- 1 lb fresh strawberries: Choose firm, ripe berries for the best flavor and structure.
- 8 oz cream cheese (room temperature): Creates a smooth, rich filling that’s easy to pipe.
- 1/2 cup powdered sugar: Sweetens the filling without graininess, blending seamlessly.
- 1 tsp vanilla extract: Adds warm, aromatic depth to the cream cheese.
- 1/4 cup heavy cream: Lightens the filling for a fluffy, pipeable texture.
- 1/4 cup graham cracker crumbs: Provides a crunchy, sweet topping reminiscent of cheesecake.
- 1 tbsp lemon zest (fresh): Brightens the filling with a zesty, citrusy pop.
Step-by-Step Instructions
- Prep the Strawberries: Rinse strawberries and pat dry. Cut off the tops and slice each berry in half lengthwise. Use a small spoon or melon baller to scoop out a small cavity in each half for the filling.
- Make the Filling: In a medium bowl, beat room-temperature cream cheese, powdered sugar, vanilla extract, and lemon zest until smooth. Add heavy cream and beat until light and fluffy, about 1-2 minutes.
- Fill a Piping Bag: Spoon the cream cheese mixture into a piping bag fitted with a star tip, or use a zip-top bag with a corner snipped off for easy piping.
- Pipe the Filling: Pipe the cream cheese mixture into the cavity of each strawberry half, creating a swirled, generous filling. Work gently to avoid overfilling.
- Add Topping: Sprinkle graham cracker crumbs over the filled strawberries for a crunchy finish. Press lightly to ensure they stick.
- Chill Briefly: Place the strawberries on a tray and refrigerate for 10 minutes to set the filling, making them easier to serve.
Tips for Success
- Use room-temperature cream cheese to avoid lumps and ensure a smooth filling.
- Choose large, firm strawberries to hold the filling without breaking.
- Pipe the filling slowly to create neat swirls and prevent spills.
- Chill the strawberries briefly before serving to firm up the filling for clean bites.
Serving Suggestions
Serve these deviled strawberries chilled on a decorative platter for a stunning presentation at brunches or parties. Pair with a glass of sparkling lemonade or prosecco for a refreshing complement to the sweet-tart berries. For extra flair, garnish with fresh mint leaves or drizzle with melted chocolate, arranging them in a circular pattern for a show-stopping dessert spread.

Storage Tips
Store deviled strawberries in an airtight container in the refrigerator for up to 2 days, though they’re best enjoyed fresh. Place parchment paper between layers to prevent sticking. Avoid freezing, as the strawberries will become mushy and the filling may separate. Keep refrigerated until serving to maintain freshness.
FAQs
Can I use frozen strawberries?
Fresh strawberries are best for texture and flavor. Frozen berries become too soft and watery.
Can I substitute the cream cheese?
Mascarpone works as a sweeter, creamier alternative, but avoid low-fat cream cheese for best results.
What if I don’t have a piping bag?
Use a zip-top bag with a corner cut off, or spoon the filling into the strawberries for a rustic look.
Can I make these ahead of time?
Yes, prepare up to 24 hours in advance and refrigerate, but add graham crumbs just before serving to stay crunchy.
Conclusion
These deviled strawberries are a sweet, creamy delight that’s as easy to make as it is to love. Perfect for any occasion, they’ll steal the show with their vibrant look and irresistible flavor. Try them out, share with friends, and let us know how they turn out!
mozzarella pepperoni croissant rolls recipe

Imagine pulling a baking sheet from the oven, the air filled with the aroma of buttery pastry, melted mozzarella, and savory pepperoni. The rolls are golden brown, puffed up, and just begging to be torn apart. That first bite delivers a crisp, flaky exterior that gives way to a warm, gooey center of stretchy cheese and perfectly seasoned meat. These mozzarella pepperoni croissant rolls are pure comfort food—pizza night and bakery-fresh pastry rolled into one irresistible handheld treat-. They come together in under 30 minutes with simple ingredients, making them perfect for game day gatherings, after-school snacks, party appetizers, or a fun twist on weeknight dinner-. Get ready to fall in love with these cheesy, meaty bites that disappear in minutes every single time-19
Ingredients
- 1 can (8 oz) refrigerated crescent roll dough (8 triangles): This is the secret to flaky, buttery croissant rolls without the fuss of making dough from scratch. Keep the dough cold until you're ready to use it for the best rise and texture.
- 4 mozzarella cheese sticks, halved (or 1 ½ cups shredded mozzarella): Mozzarella provides that classic, stretchy, creamy cheese pull we all love. Whole milk mozzarella sticks melt beautifully and are less likely to leak than shredded cheese.
- 24–32 slices pepperoni: Pepperoni brings a robust, salty, and slightly spicy flavor that perfectly complements the mild cheese. Regular or turkey pepperoni both work well. Pat the slices with a paper towel to remove excess grease before rolling.
- 1 teaspoon Italian seasoning: This blend of herbs (oregano, basil, thyme) adds aromatic depth and that classic pizza taste.
- ½ teaspoon garlic powder: For a savory kick that enhances all the other flavors.
- 2 tablespoons unsalted butter, melted: Brushed on top before baking, this creates a gorgeous, golden, shiny finish and adds extra richness.
- 1 egg, beaten (optional, for egg wash): Brushing the rolls with egg wash gives them a beautiful, glossy sheen.
- 2 tablespoons grated Parmesan cheese (optional): Sprinkled on top, it adds a salty, nutty flavor and a little extra crunch.
Instructions
- Preheat and Prep: Preheat your oven to 375°F (190°C). Line a baking sheet with parchment paper. This prevents sticking and makes cleanup a breeze-1.
- Prepare the Dough: Pop open the can of crescent roll dough and carefully separate it into 8 triangles along the perforated lines-1. Place the triangles on your prepared baking sheet or a clean work surface.
- Add the Filling: Place 3–4 slices of pepperoni on the wide end of each dough triangle-. Top the pepperoni with half of a mozzarella stick (or a generous pinch of shredded cheese)-. Sprinkle a little Italian seasoning and garlic powder over the filling.
- Roll Them Up: Starting from the wide end, tightly roll each triangle towards the pointed tip, tucking the filling in as you go-5. Gently pinch the edges and the tip to seal the roll completely. This prevents the cheese from leaking out during baking-.
- Apply the Topping (Optional): In a small bowl, mix the melted butter with a pinch of garlic powder. Brush this mixture over the tops of each roll-1. For an even more golden finish, you can brush them with beaten egg instead-20. Sprinkle with grated Parmesan cheese if desired.
- Bake to Perfection: Place the rolls on the baking sheet, seam-side down, spacing them about 1 inch apart-2. Bake for 12–15 minutes, or until they are puffed up and golden brown-1.
- Cool and Serve: Remove from the oven and let them cool on the baking sheet for about 5 minutes. This allows the cheese to set slightly, making them easier to handle and enjoy without burning your mouth--20.