
Craving a vibrant, satisfying meal that’s bursting with bold flavors and textures? This taco salad recipe is your answer! Perfect for busy weeknights, casual gatherings, or a fun family dinner, this dish combines zesty seasoned beef, crisp lettuce, juicy tomatoes, and creamy avocado into a colorful bowl of goodness.
It’s endlessly customizable, quick to whip up, and guaranteed to please everyone at the table. Let’s dive into this crowd-pleasing recipe that brings the fiesta to your kitchen!
Recipe Overview
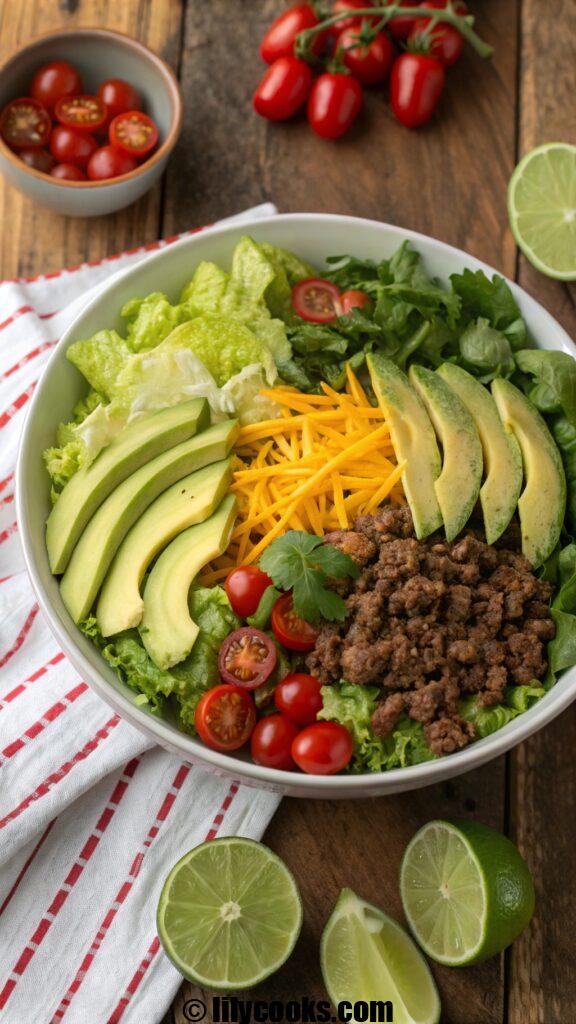
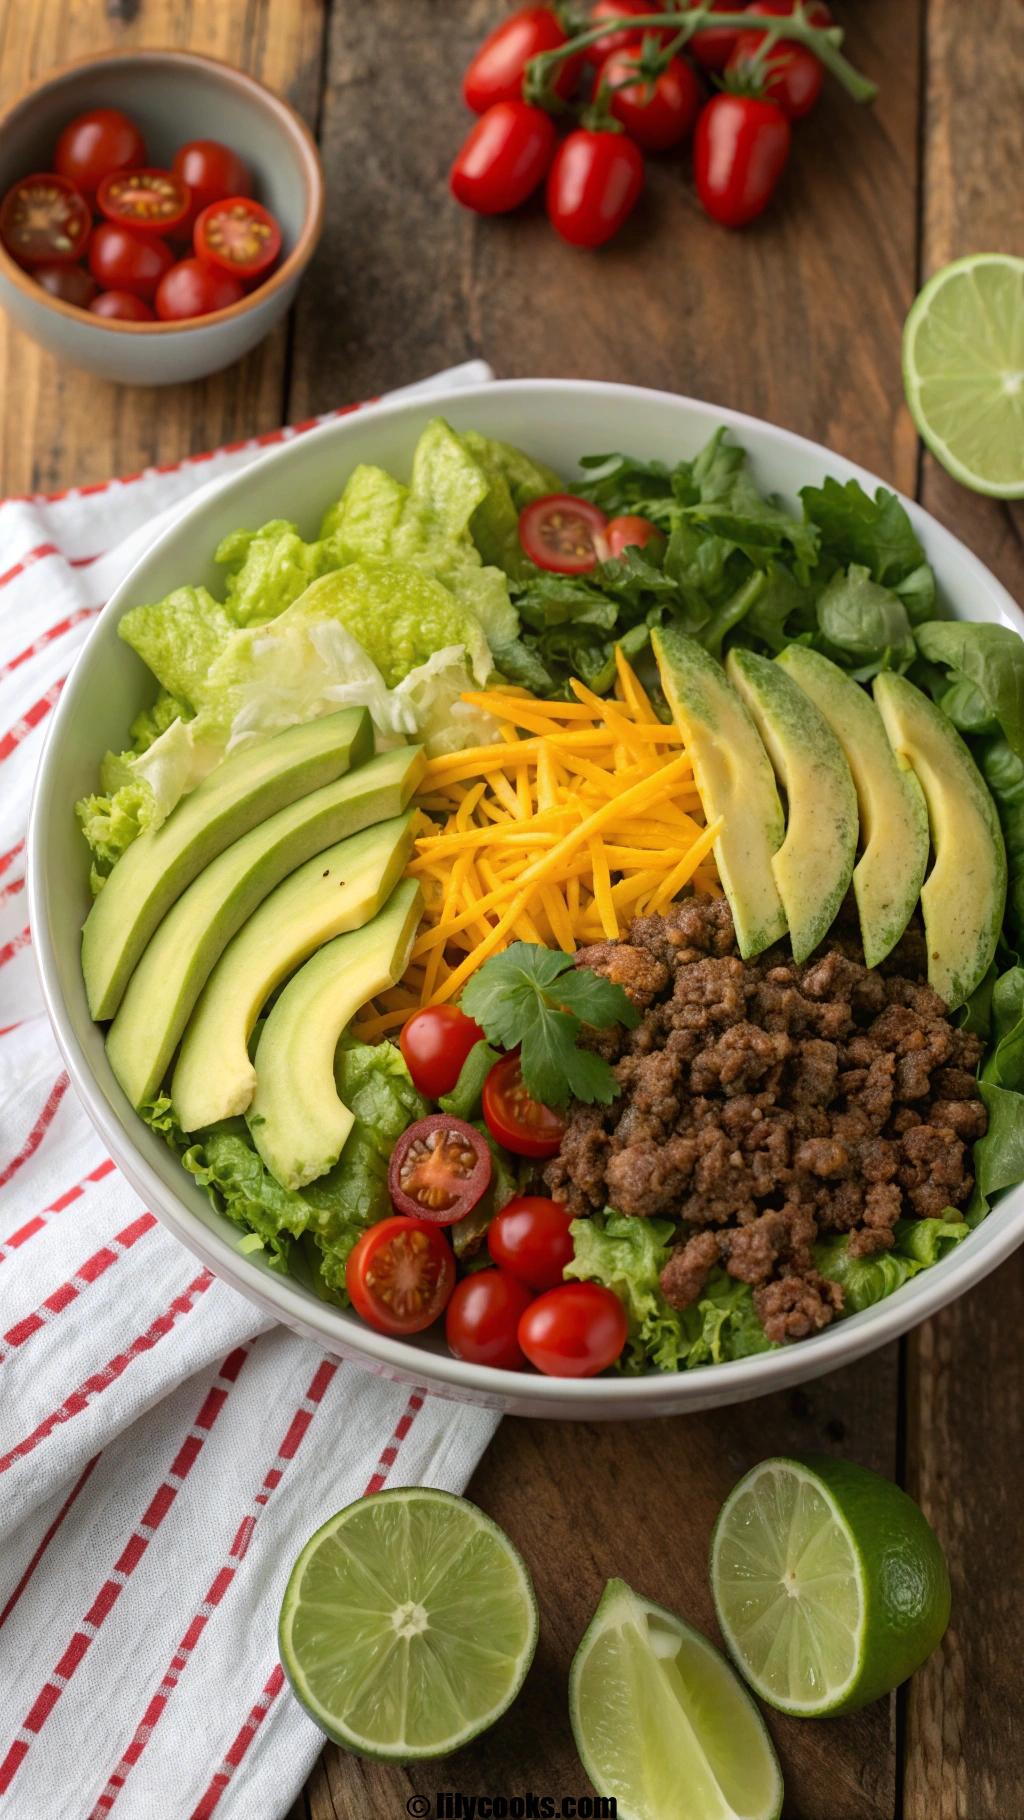
This taco salad is a delightful mix of crunchy, creamy, and savory elements. The seasoned ground beef delivers a smoky, spicy kick, while fresh veggies add crispness and color. Topped with a tangy dressing, it’s a one-bowl meal that’s ready in under 30 minutes. It’s versatile enough for dietary tweaks and perfect for meal prep or gatherings.
Preparation Time: 15 minutes
Cooking Time: 10 minutes
Total Time: 25 minutes
Servings: 4-6
Ingredients List
- 1 lb ground beef (80/20): Lean yet juicy, it carries the bold taco seasoning perfectly.
- 1 packet taco seasoning (or homemade blend): Adds smoky, spicy depth; use low-sodium for control.
- 1 head romaine lettuce (chopped, about 6 cups): Crisp and sturdy, it holds up to toppings.
- 1 cup cherry tomatoes (halved): Juicy bursts of sweetness balance the spice.
- 1 cup shredded cheddar cheese: Melty and sharp, it adds rich flavor.
- 1 avocado (diced): Creamy and buttery, it elevates the salad’s texture.
- 1 can (15 oz) black beans (drained, rinsed): Hearty and protein-packed for extra substance.
- 1 cup corn kernels (fresh or canned): Sweet and crunchy for pops of flavor.
- 1/2 red onion (finely diced): Adds a sharp, tangy bite.
- 1 cup tortilla chips (crushed): For that irresistible crunch.
- 1/2 cup sour cream: Smooths out the spice with creamy tang.
- 1/4 cup salsa: Brings zesty, fresh flavor to the dressing.
- 1 lime (juiced): Brightens the dish with a citrusy zing.
- 1/4 cup fresh cilantro (chopped, optional): Adds a fresh, herbaceous note.
- Salt and pepper to taste: Enhances all the flavors.
Note: Use fresh, high-quality ingredients for the best flavor. Room-temperature sour cream blends smoother for the dressing.
Step-by-Step Instructions
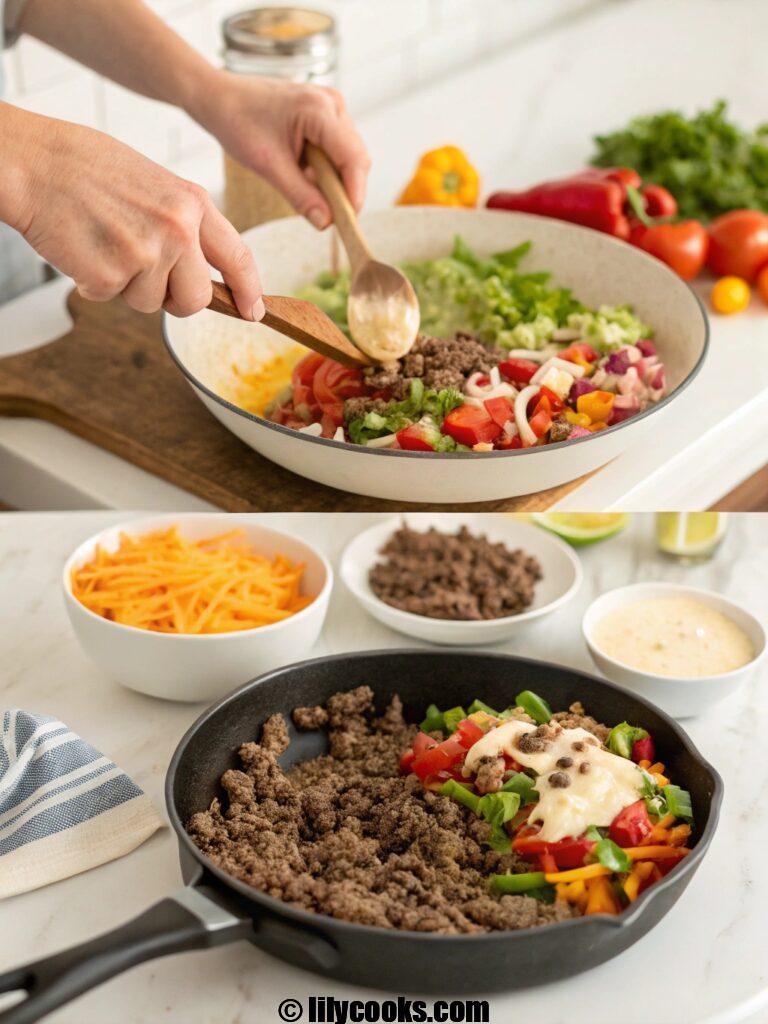
- Cook the Beef: In a large skillet over medium heat, cook the ground beef, breaking it apart with a spoon, until browned (about 6-8 minutes). Drain excess fat. Add taco seasoning and 1/4 cup water, stirring until thickened (2-3 minutes). Set aside to cool slightly. Tip: Don’t overcook; keep the beef juicy for the best texture.
- Prepare the Dressing: In a small bowl, whisk together sour cream, salsa, and lime juice until smooth. Add a pinch of salt and pepper. Adjust with more lime for tanginess. Tip: Taste as you go to balance the flavors.
- Chop the Veggies: Wash and chop the romaine lettuce, halve the cherry tomatoes, dice the avocado, and finely chop the red onion. Place in a large serving bowl. Tip: Keep veggies bite-sized for easy eating.
- Assemble the Salad: Add black beans, corn, and shredded cheese to the bowl of veggies. Spoon the seasoned beef over the top. Drizzle with dressing and toss gently to combine. Sprinkle crushed tortilla chips and cilantro (if using) on top. Tip: Add chips last to maintain their crunch.
- Serve Immediately: Divide into bowls or serve family-style. Squeeze extra lime juice over the top for a fresh kick.
Tips for Success
- Season Thoughtfully: Taste the beef after adding seasoning; adjust with extra chili powder or cumin if needed.
- Keep It Crunchy: Add tortilla chips just before serving to avoid sogginess.
- Customize Heat: Swap salsa for a milder or spicier version to suit your taste.
- Prep Ahead: Chop veggies and cook beef in advance, storing separately to keep everything fresh.
- Balance Textures: Ensure a mix of creamy (avocado, dressing), crunchy (chips, lettuce), and hearty (beef, beans) elements.
Serving Suggestions

Serve this taco salad as a standalone meal or pair it with warm cornbread or a refreshing mango margarita for a festive vibe. For a fun twist, offer extra toppings like jalapeños, hot sauce, or guacamole on the side. Present it in a large, colorful bowl for family-style sharing, or portion into individual mason jars for a portable lunch. Garnish with lime wedges and a sprinkle of cilantro for a vibrant, Instagram-worthy look.
Storage Tips
- Room Temperature: Best served fresh. Don’t leave out for more than 2 hours.
- Refrigeration: Store components (beef, veggies, dressing) separately in airtight containers for up to 3 days. Assemble just before eating to maintain freshness.
- Freezing: Freeze cooked beef for up to 3 months. Thaw overnight in the fridge before reheating. Veggies and dressing don’t freeze well.
- Reheating: Warm beef in a skillet over low heat, adding a splash of water to loosen the seasoning.
FAQs
Can I make this vegetarian?
Swap the beef for plant-based crumbles or extra beans. Add roasted sweet potatoes for heartiness.
What’s a good substitute for sour cream?
Use Greek yogurt for a similar creamy texture with a tangy twist.
Can I use a different protein?
Yes! Try shredded chicken, ground turkey, or shrimp for a lighter option.
How do I make it gluten-free?
Use gluten-free tortilla chips and check that your taco seasoning is gluten-free.
Can I prep this for meal prep?
Absolutely! Store components separately and assemble daily to keep it fresh and crunchy.
Conclusion
This taco salad is a game-changer—fresh, flavorful, and so easy to make! It’s the perfect way to bring bold, Mexican-inspired flavors to your table. Try it for your next dinner, and watch it become a family favorite. Share your creations with us in the comments or on social media—we can’t wait to see your spin on this dish!
Chocolate chip pumpkin cookies recipe

These cookies are a breeze to whip up, requiring no electric mixer and just one bowl for the wet ingredients. The pumpkin puree ensures an exceptionally tender and moist crumb, while a blend of cinnamon, nutmeg, and cloves provides that signature autumnal warmth. Semi-sweet chocolate chips offer a delightful contrast to the sweet, spiced base, creating a perfect balance of flavors. This recipe yields about 24 perfectly puffy cookies, making it ideal for sharing.
Ingredients
- 1 ½ cups all-purpose flour: Provides the structure for the cookies. Spoon and level the flour into your measuring cup to avoid a dry, dense cookie.
- 1 teaspoon baking soda: The leavening agent that gives the cookies their beautiful rise and soft texture.
- 1 teaspoon ground cinnamon: The quintessential fall spice that pairs perfectly with pumpkin.
- ½ teaspoon ground nutmeg: Adds a warm, nutty depth to the spice blend.
- ¼ teaspoon ground cloves: A pinch of cloves adds a subtle, complex warmth that elevates the overall flavor.
- ½ teaspoon salt: Balances the sweetness and enhances all the other flavors.
- ½ cup unsalted butter, melted and slightly cooled: Melted butter contributes to the chewy texture and rich, buttery flavor. Using unsalted allows you to control the salt level.
- ½ cup unsalted butter, melted and slightly cooled: Melted butter contributes to the chewy texture and rich, buttery flavor. Using unsalted allows you to control the salt level.
- ¾ cup packed light brown sugar: Adds moisture and a deep, caramel-like sweetness that complements the pumpkin.
- ¾ cup packed light brown sugar: Adds moisture and a deep, caramel-like sweetness that complements the pumpkin.
- ¼ cup granulated sugar: Helps create slightly crisp edges while the brown sugar keeps the centers soft.
- ¼ cup granulated sugar: Helps create slightly crisp edges while the brown sugar keeps the centers soft.
- 1 large egg, at room temperature: Room-temperature eggs emulsify more easily into the batter, creating a uniform texture.
- 1 large egg, at room temperature: Room-temperature eggs emulsify more easily into the batter, creating a uniform texture.
- 2 teaspoons vanilla extract: Enhances the flavor of both the pumpkin and the chocolate.
- 2 teaspoons vanilla extract: Enhances the flavor of both the pumpkin and the chocolate.
- 1 cup pumpkin puree: The star of the show! Use 100% pure pumpkin puree, not pumpkin pie filling, which contains added sugar and spices.
- 1 cup pumpkin puree: The star of the show! Use 100% pure pumpkin puree, not pumpkin pie filling, which contains added sugar and spices.
- 1 ½ cups semi-sweet chocolate chips: Provides those irresistible bursts of melty chocolate. Feel free to use dark or milk chocolate chips based on your preference.
- 1 ½ cups semi-sweet chocolate chips: Provides those irresistible bursts of melty chocolate. Feel free to use dark or milk chocolate chips based on your preference.
Instructions
- Preheat and Prepare: Preheat your oven to 350°F (175°C). Line two large baking sheets with parchment paper. This prevents sticking and ensures even baking.
- Whisk Dry Ingredients: In a medium bowl, whisk together the flour, baking soda, cinnamon, nutmeg, cloves, and salt. Set this bowl aside.
- Combine Wet Ingredients: In a large bowl, whisk together the melted butter, brown sugar, and granulated sugar until well combined. The mixture should look smooth and glossy. Add the room-temperature egg and vanilla extract, whisking until fully incorporated.
- Add the Pumpkin: Whisk in the pumpkin puree until the mixture is completely smooth and uniform. The batter will look rich and deeply orange.
- Bring It Together: Pour the dry ingredients into the wet ingredients. Using a rubber spatula, gently fold the mixture together until just combined. The batter will be thick and sticky. Be careful not to overmix, as this can develop gluten and make the cookies tough.
- Fold in the Chocolate: Gently fold in the semi-sweet chocolate chips until they are evenly distributed throughout the dough.
- Scoop and Bake: Using a cookie scoop or a spoon, drop heaping tablespoons of dough onto the prepared baking sheets, spacing them about 2 inches apart to allow for spreading. Bake for 12-14 minutes, or until the edges are set and lightly golden brown. The centers will still look soft and puffy.
- Cool: Allow the cookies to cool on the baking sheet for 5 minutes. This allows them to set before you transfer them to a wire rack to cool completely.