
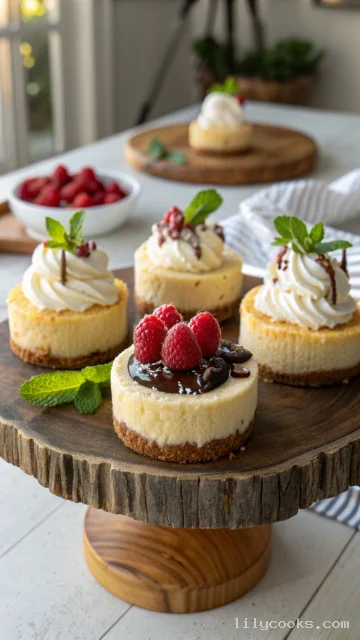
There is something undeniably charming about a dessert that feels entirely your own. These mini cheesecakes deliver that exact feeling with every single bite. Each little cheesecake boasts a golden, buttery graham cracker crust that gives way to a silky, smooth, and luxuriously creamy filling. The flavor is a perfect harmony of tangy and sweet, with a bright, citrusy note from fresh lemon zest that cuts through the richness.
Recipe Overview
This easy mini cheesecake recipe delivers all the creamy, tangy goodness of a classic New York-style cheesecake in a perfectly portioned size. Each mini cheesecake has a tender, moist crumb from the buttery crust and a filling that is flawlessly smooth and dense. The preparation is surprisingly simple, making this the ideal dessert for bakers of all skill levels. Because they are baked in a standard muffin tin, these individual cheesecakes are quick to bake and cool, eliminating the long wait times associated with larger cakes. Get ready to fall in love with a dessert that is as delicious as it is adorable.
Ingredients List
For the Graham Cracker Crust:
- 1 ½ cups (150g) graham cracker crumbs – The foundation of our cheesecake. For the best flavor, crush whole graham crackers yourself or use a high-quality store-bought crumb.
- ¼ cup (50g) granulated sugar – Adds a touch of sweetness to the crust to complement the buttery flavor.
- 6 tablespoons (85g) unsalted butter, melted – Binds the crumbs together and adds that essential rich, buttery flavor. Use unsalted to control the overall saltiness of the dessert.
For the Creamy Cheesecake Filling:
- 16 oz (450g) full-fat cream cheese, softened – This is the star of the show. Full-fat cream cheese is crucial for achieving that dense, creamy texture we all love. Low-fat versions will result in a thinner, less satisfying cheesecake. Make sure it is at room temperature for a lump-free batter.
- ¾ cup (150g) granulated sugar – Provides the perfect amount of sweetness to balance the tang of the cream cheese.
- 2 large eggs, at room temperature – Room-temperature eggs emulsify into the batter much better than cold ones, creating a smoother, more cohesive filling.
- 1 teaspoon vanilla extract – Enhances the overall flavor profile, adding a warm, aromatic depth.
- 1 tablespoon fresh lemon juice – The secret ingredient! It brightens the flavor and adds a pleasant tang that cuts through the richness without making it taste like lemon cheesecake.
- 1 teaspoon lemon zest – A crucial element for that bright, citrusy flavor that elevates these mini cheesecakes from good to great.
- ¼ cup (60g) sour cream, at room temperature – Adds a subtle tang and extra creaminess, resulting in a wonderfully rich and velvety texture.
Step-by-Step Instructions
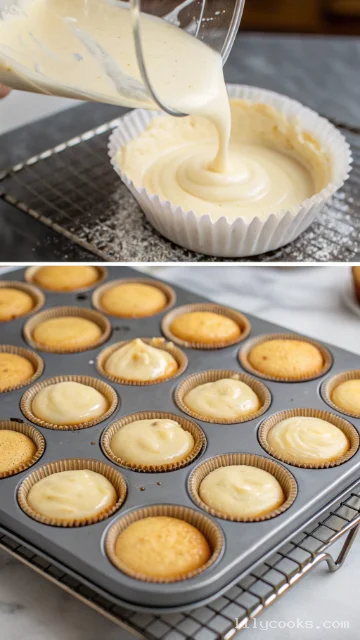
1. Prepare the Oven and Pan
First, preheat your oven to 350°F (175°C). Line a standard 12-cup muffin tin with paper liners. This not only makes for easy removal but also gives you a beautiful, easy-to-serve product.
2. Make the Crust
In a medium bowl, combine the graham cracker crumbs and ¼ cup of sugar. Pour in the melted butter and stir with a fork until the mixture resembles wet sand and is evenly moistened. Press about 1 ½ tablespoons of the crumb mixture firmly into the bottom of each lined muffin cup. A flat-bottomed shot glass or the back of a spoon works perfectly to create a compact, even crust. Bake for 5 minutes, then set aside to cool slightly while you make the filling. This blind bake ensures the crust stays crisp.
3. Create the Smooth Filling
In a large mixing bowl, beat the softened cream cheese with an electric hand mixer or stand mixer fitted with the paddle attachment on medium speed until it is completely smooth and free of lumps. Scrape down the sides and bottom of the bowl with a spatula to ensure everything is incorporated.
4. Mix in the Sugar and Eggs
Add the ¾ cup of granulated sugar to the cream cheese and beat until well combined and creamy. Next, add the eggs one at a time, mixing on low speed after each addition just until the yolk disappears. It is vital not to overmix here. Overbeating incorporates too much air, which can cause the cheesecakes to puff up and crack while baking.
5. Add the Flavorings
Pour in the vanilla extract, fresh lemon juice, and lemon zest, and beat on low speed until just combined. Finally, gently fold in the sour cream with a spatula until the batter is completely smooth and homogenous. The batter should be silky and pourable.
6. Fill and Bake
Evenly divide the cheesecake batter among the prepared muffin cups, filling each one almost to the top. Give the muffin tin a couple of gentle taps on the counter to release any large air bubbles that might be trapped in the batter.
7. The Baking Process
Place the muffin tin in the preheated oven and bake for 18-22 minutes. The edges of the cheesecakes should be set, and the centers will look slightly jiggly and underdone. This is exactly what you want. Turn off the oven, crack the door open, and let the mini cheesecakes cool inside the oven for one hour. This gentle cooling prevents the tops from cracking dramatically.
8. Chill and Serve
After an hour, remove the pan from the oven and let the cheesecakes cool completely to room temperature on a wire rack. Once they are completely cool, cover the pan with plastic wrap and transfer to the refrigerator to chill for at least 4 hours, but preferably overnight. Chilling is essential for the perfect texture. When ready to serve, gently remove the chilled mini cheesecakes from the pan and peel off the paper liners.
Tips for Success
- Room Temperature is Key: Starting with room-temperature cream cheese and eggs is non-negotiable for a silky, lump-free batter. Cold ingredients will result in a clumpy mixture that overmixing won’t fix.
- Don’t Overmix: This is the golden rule of cheesecake making. Once you add the eggs, mix on low speed just until combined. Overmixing adds too much air, which will cause the cheesecakes to puff up and then collapse, creating unsightly cracks.
- The Jiggle Test: The perfect doneness indicator is not a toothpick. The edges should be set, but the centers should have a slight jiggle when you gently shake the pan. They will continue to set as they cool.
- Use Fresh Lemons: For the best, most vibrant flavor, always use fresh lemon zest and juice. The bottled stuff just doesn’t have the same bright, citrusy aroma.
- Cooling is Crucial: The gradual cooling process is just as important as baking. Letting the cheesecakes cool in the oven with the door cracked open helps them adjust to the temperature change slowly, minimizing the risk of cracking.
Serving Suggestions
The beauty of these mini cheesecakes is their versatility. They are delicious on their own, but a simple garnish elevates them to a whole new level. For a classic presentation, top each chilled cheesecake with a dollop of whipped cream and a fresh berry. A drizzle of homemade fruit sauce is an elegant touch. Try a vibrant raspberry coulis or a warm blueberry compote. For chocolate lovers, a drizzle of rich, dark chocolate ganache is pure decadence. Arrange them on a beautiful platter and garnish with fresh mint leaves for a pop of color. They are the perfect dessert to accompany a cup of strong coffee or a glass of sweet dessert wine.
Storage Tips
These mini cheesecakes are perfect for making ahead of time.
- Room Temperature: Do not leave them out for more than 2 hours. Cheesecake is a dairy-based dessert and requires refrigeration.
- Refrigeration: Store the mini cheesecakes in an airtight container in the refrigerator for up to 5 days. The flavor and texture will actually improve as they rest.
- Freezing: These little treats freeze beautifully. To freeze, place the cooled and chilled cheesecakes on a baking sheet and freeze until solid (about 2 hours). Once frozen, wrap each one tightly in plastic wrap and then place them in a freezer-safe bag or container. They will keep well for up to 2 months. To thaw, simply transfer them to the refrigerator overnight.
FAQs
Can I use a different crust for this easy mini cheesecake recipe?
Absolutely. You can substitute the graham cracker crumbs with an equal amount of crushed vanilla wafers, chocolate wafer cookies, or even ginger snaps for a spicy twist. You can also make a gluten-free version by using certified gluten-free graham crackers or cookies.
My cheesecakes cracked on top. What did I do wrong?
Cracks are often caused by overmixing the batter, sudden temperature changes, or overbaking. Make sure to mix on low speed after adding the eggs and follow the cooling instructions carefully (cooling in the oven with the door cracked open is a game-changer). If they do crack, don’t worry! A dollop of whipped cream or fruit topping will beautifully disguise it.
How do I know when my mini cheesecakes are done baking?
Look for the edges to be set and firm. The center will still look a bit wobbly and underdone. That’s your cue to turn off the oven. The residual heat will gently finish cooking them through.
Can I reduce the sugar in this recipe?
Sugar does more than sweeten; it also affects the texture and structure of the cheesecake. You can reduce the sugar by a couple of tablespoons, but reducing it too much may result in a dense, less creamy texture. The lemon juice and zest provide a nice contrast to the sweetness in this balanced recipe.
What is the best way to remove the mini cheesecakes from the muffin pan?
Using paper liners makes removal effortless. Once they are fully chilled, simply peel the liner away from the cheesecake. If you didn’t use liners, you can run a thin, flexible knife around the edge of each cheesecake to help release it, then gently lift it out with a small offset spatula.
Conclusion
These mini cheesecakes are more than just a recipe; they are a little bite of pure joy. They are simple enough for a weekday treat yet elegant enough for the grandest celebration. I hope you feel empowered to get into the kitchen and create these creamy, dreamy desserts for yourself and the people you love. Every smooth, tangy, and perfectly portioned bite is a reminder that the best things in life are meant to be shared. I cannot wait to see your beautiful creations. Happy baking!
mini cheesecakes recipe
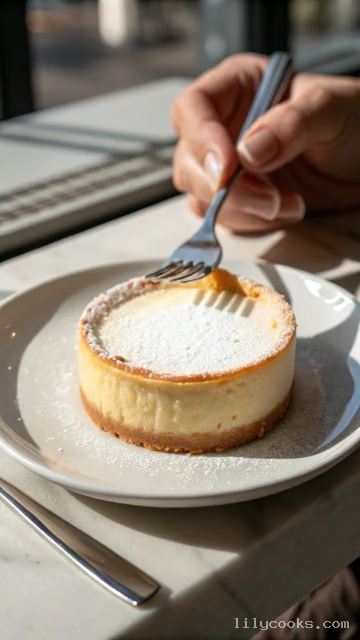
This easy mini cheesecake recipe delivers all the creamy, tangy goodness of a classic New York-style cheesecake in a perfectly portioned size. Each mini cheesecake has a tender, moist crumb from the buttery crust and a filling that is flawlessly smooth and dense. The preparation is surprisingly simple, making this the ideal dessert for bakers of all skill levels. Because they are baked in a standard muffin tin, these individual cheesecakes are quick to bake and cool, eliminating the long wait times associated with larger cakes. Get ready to fall in love with a dessert that is as delicious as it is adorable.
Ingredients
- For the Graham Cracker Crust:
- 1 ½ cups (150g) graham cracker crumbs - The foundation of our cheesecake. For the best flavor, crush whole graham crackers yourself or use a high-quality store-bought crumb.
- ¼ cup (50g) granulated sugar - Adds a touch of sweetness to the crust to complement the buttery flavor.
- 6 tablespoons (85g) unsalted butter, melted - Binds the crumbs together and adds that essential rich, buttery flavor. Use unsalted to control the overall saltiness of the dessert.
- For the Creamy Cheesecake Filling:
- 16 oz (450g) full-fat cream cheese, softened - This is the star of the show. Full-fat cream cheese is crucial for achieving that dense, creamy texture we all love. Low-fat versions will result in a thinner, less satisfying cheesecake. Make sure it is at room temperature for a lump-free batter.
- ¾ cup (150g) granulated sugar - Provides the perfect amount of sweetness to balance the tang of the cream cheese.
- 2 large eggs, at room temperature - Room-temperature eggs emulsify into the batter much better than cold ones, creating a smoother, more cohesive filling.
- 1 teaspoon vanilla extract - Enhances the overall flavor profile, adding a warm, aromatic depth.
- 1 tablespoon fresh lemon juice - The secret ingredient! It brightens the flavor and adds a pleasant tang that cuts through the richness without making it taste like lemon cheesecake.
- 1 teaspoon lemon zest - A crucial element for that bright, citrusy flavor that elevates these mini cheesecakes from good to great.
- ¼ cup (60g) sour cream, at room temperature - Adds a subtle tang and extra creaminess, resulting in a wonderfully rich and velvety texture.
Instructions
1. Prepare the Oven and Pan
First, preheat your oven to 350°F (175°C). Line a standard 12-cup muffin tin with paper liners. This not only makes for easy removal but also gives you a beautiful, easy-to-serve product.
2. Make the Crust
In a medium bowl, combine the graham cracker crumbs and ¼ cup of sugar. Pour in the melted butter and stir with a fork until the mixture resembles wet sand and is evenly moistened. Press about 1 ½ tablespoons of the crumb mixture firmly into the bottom of each lined muffin cup. A flat-bottomed shot glass or the back of a spoon works perfectly to create a compact, even crust. Bake for 5 minutes, then set aside to cool slightly while you make the filling. This blind bake ensures the crust stays crisp.
3. Create the Smooth Filling
In a large mixing bowl, beat the softened cream cheese with an electric hand mixer or stand mixer fitted with the paddle attachment on medium speed until it is completely smooth and free of lumps. Scrape down the sides and bottom of the bowl with a spatula to ensure everything is incorporated.
4. Mix in the Sugar and Eggs
Add the ¾ cup of granulated sugar to the cream cheese and beat until well combined and creamy. Next, add the eggs one at a time, mixing on low speed after each addition just until the yolk disappears. It is vital not to overmix here. Overbeating incorporates too much air, which can cause the cheesecakes to puff up and crack while baking.
5. Add the Flavorings
Pour in the vanilla extract, fresh lemon juice, and lemon zest, and beat on low speed until just combined. Finally, gently fold in the sour cream with a spatula until the batter is completely smooth and homogenous. The batter should be silky and pourable.
6. Fill and Bake
Evenly divide the cheesecake batter among the prepared muffin cups, filling each one almost to the top. Give the muffin tin a couple of gentle taps on the counter to release any large air bubbles that might be trapped in the batter.
7. The Baking Process
Place the muffin tin in the preheated oven and bake for 18-22 minutes. The edges of the cheesecakes should be set, and the centers will look slightly jiggly and underdone. This is exactly what you want. Turn off the oven, crack the door open, and let the mini cheesecakes cool inside the oven for one hour. This gentle cooling prevents the tops from cracking dramatically.
8. Chill and Serve
After an hour, remove the pan from the oven and let the cheesecakes cool completely to room temperature on a wire rack. Once they are completely cool, cover the pan with plastic wrap and transfer to the refrigerator to chill for at least 4 hours, but preferably overnight. Chilling is essential for the perfect texture. When ready to serve, gently remove the chilled mini cheesecakes from the pan and peel off the paper liners.