
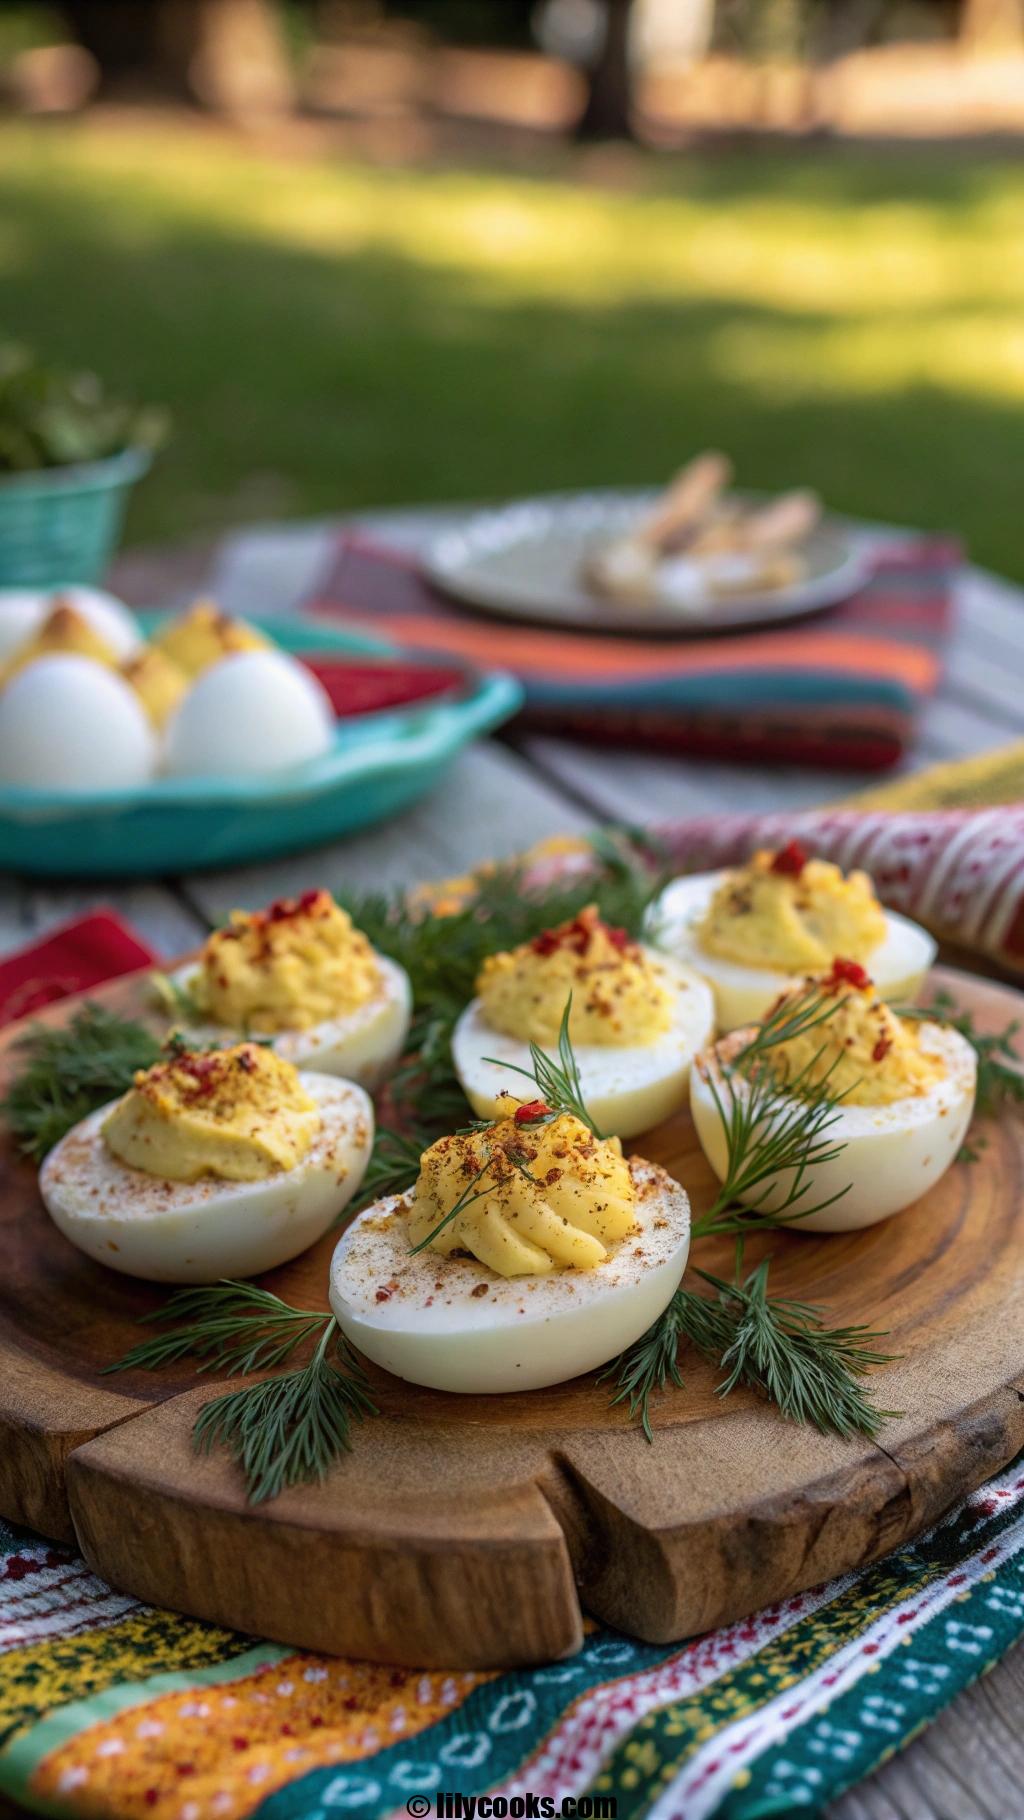
Welcome to the ultimate deviled eggs recipe! These creamy, tangy, and perfectly spiced appetizers are a crowd-pleaser at any gathering, from summer picnics to holiday dinners. Their rich, velvety filling and vibrant flavor make them irresistible, and they’re so easy to whip up, you’ll wonder why you don’t make them more often.
Recipe Overview

This deviled eggs recipe is all about bold flavors and a silky-smooth texture. The combination of creamy mayo, zesty mustard, and a hint of pickle juice creates a tangy, savory filling that perfectly complements the tender egg whites. Ready in just 30 minutes, it’s a quick, budget-friendly dish that’s ideal for beginners and seasoned cooks alike. With simple ingredients and endless garnish options, these eggs are as versatile as they are delicious.
Preparation Time: 15 minutes
Cooking Time: 15 minutes
Total Time: 30 minutes
Servings: 12 deviled eggs
Ingredients List
- 6 large eggs, preferably a week old (older eggs peel more easily for a smooth finish)
- 3 tablespoons mayonnaise (use full-fat for a rich, creamy texture)
- 1 teaspoon Dijon mustard (adds a sharp, tangy kick)
- 1 teaspoon pickle juice (for a subtle briny depth; dill or sweet pickle juice works)
- 1/2 teaspoon white vinegar (enhances the tangy flavor)
- 1/4 teaspoon kosher salt (adjust to taste for perfect seasoning)
- 1/8 teaspoon black pepper (freshly ground for a slight spicy note)
- Paprika, for garnish (smoked or sweet, for color and flavor)
- Fresh dill or chives, optional (for a fresh, herbaceous touch)
Note: Use room-temperature eggs to prevent cracking during boiling. Fresh herbs elevate the presentation and add a burst of flavor.
Step-by-Step Instructions
- Boil the Eggs: Place eggs in a medium saucepan and cover with cold water, about an inch above the eggs. Bring to a rolling boil over medium-high heat. Once boiling, cover the pan, remove from heat, and let sit for 12 minutes. This ensures perfectly cooked yolks with no green ring.
- Cool and Peel: Transfer eggs to an ice bath (a bowl of ice water) for 5 minutes to stop cooking and make peeling easier. Gently tap each egg on a hard surface and peel under running water for smooth shells.
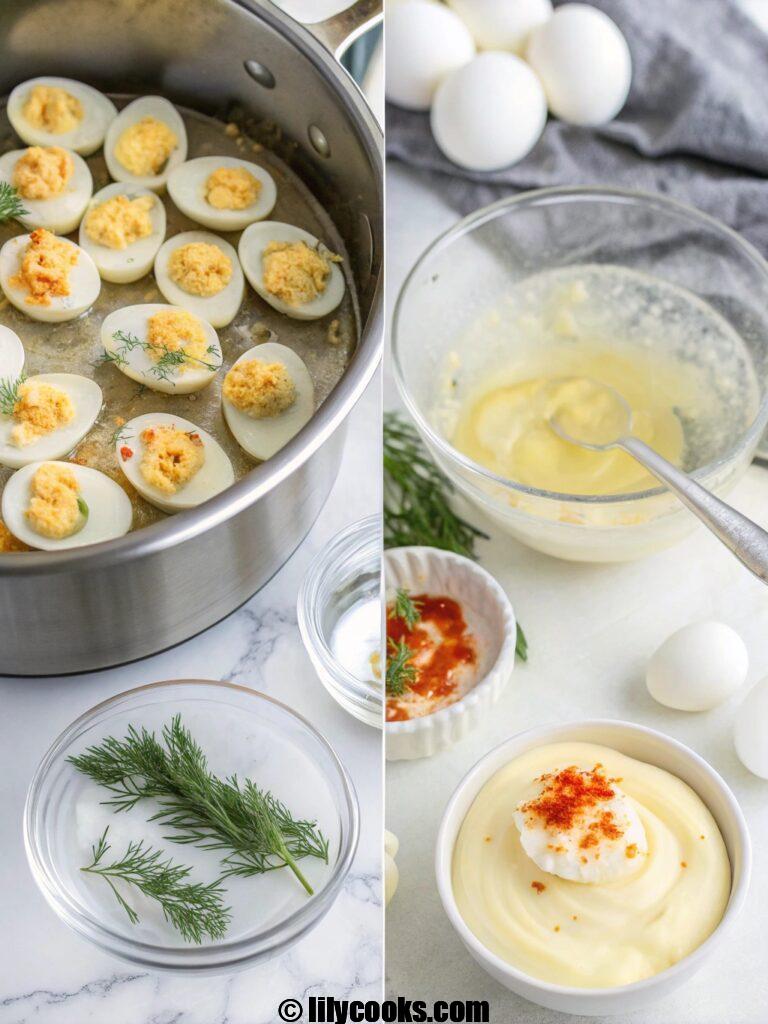
- Halve the Eggs: Slice eggs lengthwise with a sharp knife. Carefully scoop out the yolks into a medium bowl, keeping the whites intact. Place egg white halves on a platter.
- Make the Filling: Mash the yolks with a fork until smooth. Add mayonnaise, Dijon mustard, pickle juice, vinegar, salt, and pepper. Mix until creamy and lump-free. For an extra-smooth texture, use a hand mixer or food processor. Taste and adjust seasoning if needed.
- Fill the Eggs: Spoon or pipe the yolk mixture into the egg white halves. For a professional look, use a piping bag with a star tip to create swirls.
- Garnish and Serve: Sprinkle with paprika for a pop of color and flavor. Add a small sprig of dill or chopped chives for freshness. Serve immediately or chill until ready.
Tips for Success
- Choose Older Eggs: Eggs that are 7–10 days old peel more easily than fresh ones, ensuring smooth, attractive whites.
- Don’t Skip the Ice Bath: Cooling eggs quickly prevents overcooking and makes peeling a breeze.
- Adjust Seasoning: Taste the filling before piping and add more salt, pepper, or pickle juice to suit your preference.
- Use a Piping Bag: For a polished presentation, pipe the filling instead of spooning it. A zip-top bag with a corner snipped works in a pinch.
- Avoid Overmixing: Blend the filling just until smooth to maintain its creamy texture without becoming runny.
Serving Suggestions
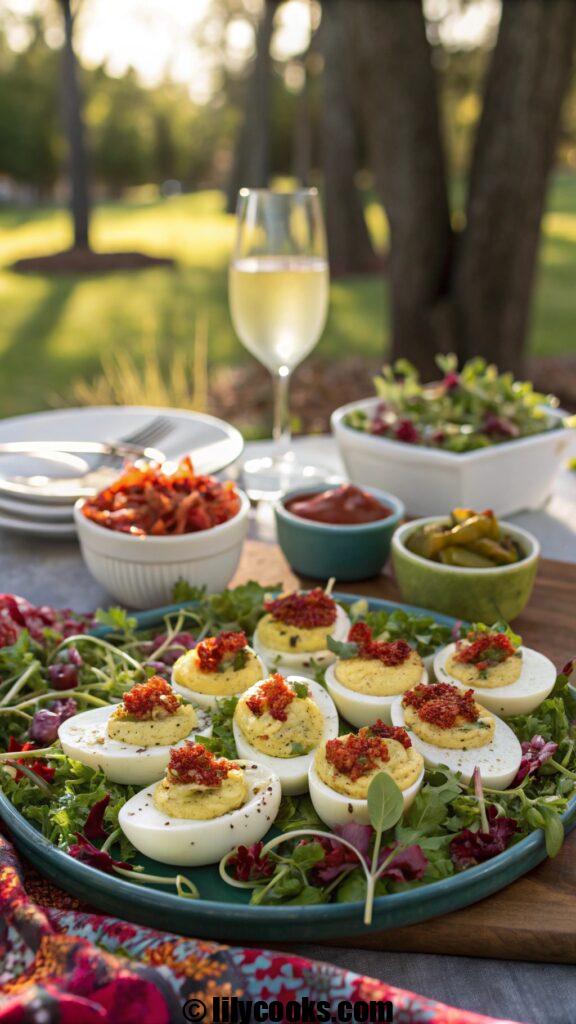
Serve these deviled eggs on a chilled platter for a stunning appetizer at barbecues, potlucks, or holiday feasts. Pair them with crisp white wine, iced tea, or a light cucumber salad to balance their richness. For a fun twist, arrange them on a bed of microgreens or edible flowers for a vibrant, Instagram-worthy display. Try topping with crumbled bacon, a dash of hot sauce, or even a tiny pickle slice for extra flair.
Storage Tips
- Room Temperature: Deviled eggs can sit out for up to 2 hours at room temperature. Serve on a chilled platter to keep them fresh longer.
- Refrigeration: Store in an airtight container in the fridge for up to 2 days. Place egg whites and filling separately to prevent sogginess, assembling just before serving.
- Freezing: Freezing is not recommended, as the egg whites become rubbery and the filling loses its creamy texture.
FAQs
Can I use Greek yogurt instead of mayonnaise?
Yes, Greek yogurt can replace mayonnaise for a lighter, tangier filling. Use full-fat yogurt for the best texture.
How can I make deviled eggs spicier?
Add a pinch of cayenne pepper or a few drops of hot sauce to the filling. Garnish with jalapeño slices for extra heat.
What if my eggs crack while boiling?
Cracked eggs are still edible but may look uneven. Use them for practice and save perfect eggs for presentation.
Can I make deviled eggs ahead of time?
Yes, prepare the filling and egg whites a day in advance, store separately in the fridge, and assemble before serving.
Are there vegan alternatives for deviled eggs?
Try using boiled potato halves or tofu as a base, with a vegan mayo-based filling for a similar creamy texture.
Conclusion
This deviled eggs recipe is your go-to for a quick, crowd-pleasing dish that’s bursting with creamy, tangy goodness. It’s simple enough for beginners yet versatile enough to impress at any gathering. Give it a try, share your creations, and let me know how they turn out! Your guests will be begging for seconds.
Delicious chicken fajita rice bowl recipe
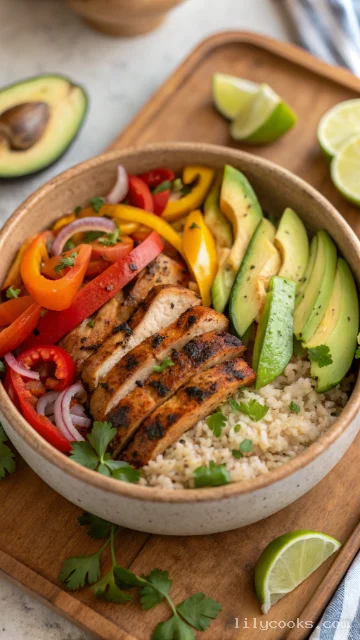
his chicken fajita rice bowl delivers bold Tex-Mex flavors with a perfect balance of smoky heat from the spices, bright acidity from fresh lime juice, and natural sweetness from caramelized bell peppers and onions. The chicken stays incredibly juicy and tender thanks to a quick marinade, while the rice soaks up all those delicious pan juices. Ready in just 35 minutes, this recipe uses only one skillet (plus a pot for rice) making cleanup a breeze. Each bowl offers a satisfying combination of textures - crispy-edged chicken, slightly softened vegetables with a bit of crunch, and fluffy rice that ties everything together. The entire dish bursts with vibrant colors and aromas that will fill your kitchen with the irresistible scent of sizzling fajitas.
Ingredients
- 1 cup long-grain white rice (jasmine or basmati work beautifully) - The long grains stay separate and fluffy, creating the perfect base.
- 1 cup long-grain white rice (jasmine or basmati work beautifully) - The long grains stay separate and fluffy, creating the perfect base.
- 2 cups water or chicken broth (use broth for extra flavor depth)
- 2 cups water or chicken broth (use broth for extra flavor depth)
- 1 tablespoon fresh lime juice (about 1 lime) - Freshly squeezed makes all the difference
- 1 tablespoon fresh lime juice (about 1 lime) - Freshly squeezed makes all the difference
- Zest of 1 lime - This adds that bright, essential citrus aroma.
- Zest of 1 lime - This adds that bright, essential citrus aroma.
- 2 tablespoons chopped fresh cilantro - Adds freshness and that signature Tex-Mex flavor.
- 2 tablespoons chopped fresh cilantro - Adds freshness and that signature Tex-Mex flavor.
- 1 teaspoon salt
- 1 teaspoon salt
- For the Chicken Fajita Marinade:
- For the Chicken Fajita Marinade:
- 1.5 pounds boneless, skinless chicken breasts (about 2 large) - Slice into strips for quick cooking.
- 1.5 pounds boneless, skinless chicken breasts (about 2 large) - Slice into strips for quick cooking.
- 2 tablespoons olive oil - Helps carry the spices and promotes browning.
- 2 tablespoons olive oil - Helps carry the spices and promotes browning.
- 3 cloves garlic, minced - Fresh garlic offers the best pungent flavor.
- 3 cloves garlic, minced - Fresh garlic offers the best pungent flavor.
- 1 tablespoon chili powder - The backbone of fajita seasoning.
- 1 tablespoon chili powder - The backbone of fajita seasoning.
- 1 teaspoon ground cumin - Adds that warm, earthy depth.
- 1 teaspoon ground cumin - Adds that warm, earthy depth.
- 1 teaspoon smoked paprika - Gives that subtle smokiness you get from a hot grill.
- 1 teaspoon smoked paprika - Gives that subtle smokiness you get from a hot grill.
- ½ teaspoon onion powder
- ½ teaspoon onion powder
- ½ teaspoon dried oregano
- ½ teaspoon dried oregano
- ½ teaspoon salt
- ½ teaspoon salt
- ¼ teaspoon black pepper
- ¼ teaspoon black pepper
- Juice of 1 lime - The acid tenderizes the chicken while adding brightness.
- Juice of 1 lime - The acid tenderizes the chicken while adding brightness.
- For the Fajita Vegetables:
- For the Fajita Vegetables:
- 2 tablespoons olive oil
- 2 tablespoons olive oil
- 1 large yellow onion, sliced into strips
- 1 large yellow onion, sliced into strips
- 1 large red bell pepper, sliced into strips
- 1 large red bell pepper, sliced into strips
- 1 large yellow bell pepper, sliced into strips (or green bell pepper)
- 1 large yellow bell pepper, sliced into strips (or green bell pepper)
- 1 teaspoon chili powder
- 1 teaspoon chili powder
- Salt and pepper to taste
- Salt and pepper to taste
- For Toppings (optional):
- For Toppings (optional):
- Fresh cilantro, chopped
- Fresh cilantro, chopped
- Sliced avocado or guacamole
- Sliced avocado or guacamole
- Sour cream or Mexican crema
- Sour cream or Mexican crema
- Salsa or pico de gallo
- Salsa or pico de gallo
- Additional lime wedges
- Additional lime wedges
- Pickled jalapeños for heat
- Pickled jalapeños for heat
Instructions
Start the Rice: In a medium saucepan, combine the rice, chicken broth (or water), and salt. Bring it to a boil over high heat. Once boiling, reduce the heat to low, cover the pot with a tight-fitting lid, and let it simmer for 15 minutes. Do not lift the lid! This traps the steam and cooks the rice perfectly. After 15 minutes, remove it from the heat and let it sit, covered, for another 5-10 minutes to absorb any remaining moisture.
Prepare the Spices and Chicken: While the rice is resting, prepare your fajita seasoning. In a small bowl, whisk together the chili powder, cumin, smoked paprika, garlic powder, onion powder, oregano, salt, and pepper. Slice your chicken breasts or thighs against the grain into ½-inch strips. This is important for tender, easy-to-chew pieces. Place the chicken in a bowl and toss it with half of the spice mix.
Cook the Chicken: Heat 1 tablespoon of olive oil in a large cast-iron or heavy-bottomed skillet over medium-high heat. When the oil is shimmering, add the seasoned chicken strips in a single layer. It is vital not to overcrowd the pan; cook in batches if necessary. Let the chicken sear without moving it for 2-3 minutes until it develops a deep, golden-brown crust. Flip and cook for another 2-3 minutes until cooked through and no longer pink in the center. Remove the chicken from the skillet to a plate.
Sauté the Vegetables: Reduce the heat to medium and add the remaining 1 tablespoon of olive oil to the skillet. Add the sliced onion and bell peppers. Cook, stirring occasionally, for about 5-7 minutes, until the vegetables are slightly softened and have nice charred spots. The key here is to cook them until they are tender-crisp, not mushy. Add the minced garlic and the rest of the fajita seasoning, and cook for one more minute until fragrant.
Fluff the Rice and Combine: Back to the rice. Fluff the cooked rice with a fork. Gently fold in the fresh lime juice and chopped cilantro, mixing until the rice is evenly coated.
Build Your Bowls: Return the cooked chicken to the skillet with the vegetables and toss everything together to warm it through over low heat. To serve, spoon a generous portion of the cilantro-lime rice into each bowl and top it with the sizzling chicken and fajita vegetables. Finish with a squeeze of fresh lime juice and your favorite toppings.