

Easter basket cookie cups are the ultimate showstopper for your holiday dessert table. These adorable mini treats combine a soft, buttery sugar cookie base with a creamy frosting center, topped with vibrant green coconut “grass” and colorful candy eggs. They’re fun to make with kids, completely customizable, and guaranteed to bring smiles to everyone at your Easter brunch or spring gathering. Let’s bake some happiness together!
Recipe Overview
These Easter basket cookie cups feature a tender, chewy sugar cookie cup that cradles a luscious, creamy filling. The bright green coconut grass adds a playful pop of color, while the candy eggs on top deliver a delightful crunch in every bite. This recipe is straightforward and beginner-friendly, making it perfect for bakers of all skill levels. With a prep time of just 20 minutes and a bake time of 10-12 minutes, you’ll have a batch of these festive treats ready in under an hour.
Ingredients List
For the Cookie Cups:
- 2½ cups all-purpose flour – provides the structure and helps the cups hold their shape.
- 1 teaspoon baking soda – gives the cookies a slight lift for a tender texture.
- ¼ teaspoon kosher salt – balances the sweetness and enhances the buttery flavor.
- 1 cup unsalted butter, softened (2 sticks) – creates a rich, melt-in-your-mouth texture; make sure it’s truly soft for easy creaming.
- ½ cup brown sugar – adds moisture and a subtle caramel note.
- ½ cup granulated sugar – provides sweetness and helps the edges turn golden.
- 2 large eggs, at room temperature – bind the dough and add richness; room-temperature eggs incorporate more smoothly.
- 1 teaspoon pure vanilla extract – infuses the cookies with warm, aromatic flavor.
For the Frosting & Decorations:
- 1 cup vanilla frosting (store-bought or homemade) – serves as the creamy “filling” for the basket.
- 1 cup sweetened shredded coconut – transforms into edible “grass” with a few drops of food coloring.
- 4–6 drops green food coloring – tints the coconut for that classic Easter basket look.
- 36 mini chocolate eggs or candy-coated Easter eggs – the festive “eggs” nestled in the grass.
- Cooking spray or butter – for greasing the muffin pan to prevent sticking.
Step-by-Step Instructions
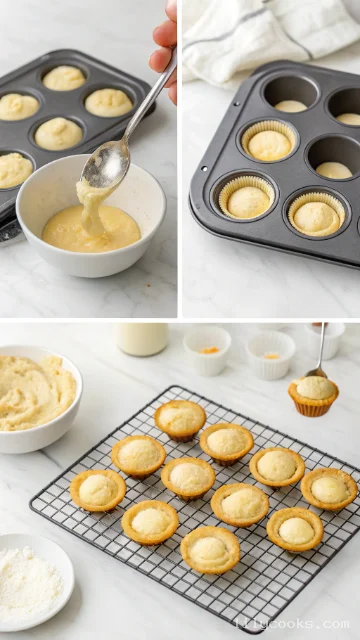
1. Preheat and Prepare: Preheat your oven to 350°F (175°C). Lightly grease a standard 12-cup muffin tin with cooking spray or butter.
2. Make the Cookie Dough: In a medium bowl, whisk together the flour, baking soda, and salt. Set aside. In a large bowl, use a hand mixer to cream the softened butter, brown sugar, and granulated sugar until light and fluffy. Add the eggs and vanilla, mixing until well combined. Gradually add the dry ingredients to the wet mixture, mixing until a soft dough forms.
3. Shape the Cookie Cups: Roll tablespoon-sized portions of dough into balls and place one in each muffin cup. Press the dough evenly across the bottom and slightly up the sides of each cavity to form a cup shape. For the most consistent results, use your thumb or the back of a teaspoon to press an indentation into the center.
4. Bake to Perfection: Bake for 10-12 minutes, or until the edges are lightly golden. The centers may puff up slightly – that’s perfectly normal!
5. Reshape While Warm: Immediately after removing the pan from the oven, use the back of a spoon or a small measuring cup to gently press down the centers of each cookie cup again. This step is crucial for creating a deep enough well to hold your frosting and toppings-.
6. Cool Completely: Allow the cookie cups to cool in the pan for about 10 minutes, then carefully transfer them to a wire rack to cool completely. Do not add frosting until they are fully cooled, or the frosting will melt.
7. Make the Coconut Grass: Place the shredded coconut in a zip-top bag, add the green food coloring, and shake until the coconut is evenly tinted.
8. Fill and Decorate: Spoon or pipe the vanilla frosting into the center of each cooled cookie cup. Sprinkle the green coconut over the frosting to resemble grass. Place 2-3 mini candy eggs on top of the coconut to complete the Easter basket look. Let the decorated cups sit for a few minutes before serving so the toppings can set.
Tips for Success
- Don’t overmix the dough: Mix just until the flour disappears. Overworking the dough can lead to tough, dense cookie cups-.
- Press the centers while warm: This is the secret to perfectly shaped baskets. If you wait until they cool, the cookies will be too firm to reshape-.
- Watch the bake time carefully: Overbaked cookie cups become dry and hard. Pull them out when the edges are just golden.
- Use a piping bag for frosting: This gives you a cleaner, more professional look and makes decorating with kids much less messy.
- Chill the dough if it’s too soft: If your dough feels sticky or difficult to shape, refrigerate it for 15-20 minutes before pressing it into the muffin tin.
Serving Suggestions
These Easter basket cookie cups are perfect for Easter brunch, spring parties, or as an edible centerpiece. Arrange them on a festive platter with pastel napkins and fresh flowers for a picture-perfect display. Pair them with a glass of cold milk, a cup of coffee, or a refreshing glass of lemonade. For an extra touch, insert small candy strips or licorice pieces into the sides of each cup to create actual basket handles. They also make wonderful homemade gifts – package them in a decorative box tied with a ribbon for a thoughtful Easter treat.
Storage Tips
Store your Easter basket cookie cups in an airtight container at room temperature for up to 3 days. For longer storage, refrigerate them for up to 5 days. If you’d like to freeze them, skip the frosting and toppings, freeze the plain cookie cups in a single layer, then transfer to a freezer-safe bag for up to 1 month. When you’re ready to enjoy them, simply thaw at room temperature and decorate fresh.
Can I use store-bought cookie dough instead of making it from scratch?
Absolutely! A 16-18 oz package of refrigerated sugar cookie dough works wonderfully and cuts down on prep time. Just follow the same baking and shaping instructions.
What other candies can I use for toppings?
Feel free to get creative! Jelly beans, pastel M&M’s, Reese’s Pieces eggs, Hershey’s eggs, or even mini marshmallows all make fantastic substitutes.
How do I prevent the cookie cups from sticking to the pan?
Generously grease your muffin tin with cooking spray or butter. For extra insurance, you can also use mini cupcake liners-.
Can I make these gluten-free?
Yes! Simply use a gluten-free all-purpose flour blend or gluten-free sugar cookie dough.
Why did my cookie cups puff up too much in the center?
That’s normal! Just press the centers down with the back of a spoon immediately after they come out of the oven while they’re still warm-.
How far in advance can I make these?
You can bake the cookie cups up to 2 days ahead and store them unfrosted at room temperature. Decorate them on the day you plan to serve for the freshest appearance and texture.
Conclusion
These Easter basket cookie cups are more than just a dessert – they’re a joyful activity that brings family and friends together. The soft, buttery cookie, the creamy frosting, and the playful toppings create a treat that’s as delicious as it is adorable. So preheat that oven, gather your little bakers, and make some sweet memories this Easter. I’d love to see your creations – share your photos and tag me so we can celebrate together!
easter basket cookie cups

These Easter basket cookie cups feature a tender, chewy sugar cookie cup that cradles a luscious, creamy filling. The bright green coconut grass adds a playful pop of color, while the candy eggs on top deliver a delightful crunch in every bite. This recipe is straightforward and beginner-friendly, making it perfect for bakers of all skill levels. With a prep time of just 20 minutes and a bake time of 10-12 minutes, you’ll have a batch of these festive treats ready in under an hour.
Ingredients
- For the Cookie Cups:
- 2½ cups all-purpose flour – provides the structure and helps the cups hold their shape
- 1 teaspoon baking soda – gives the cookies a slight lift for a tender texture
- ¼ teaspoon kosher salt – balances the sweetness and enhances the buttery flavor
- 1 cup unsalted butter, softened (2 sticks) – creates a rich, melt-in-your-mouth texture; make sure it’s truly soft for easy creaming
- ½ cup brown sugar – adds moisture and a subtle caramel note
- ½ cup granulated sugar – provides sweetness and helps the edges turn golden
- 2 large eggs, at room temperature – bind the dough and add richness; room-temperature eggs incorporate more smoothly
- 1 teaspoon pure vanilla extract – infuses the cookies with warm, aromatic flavor
- For the Frosting & Decorations:
- 1 cup vanilla frosting (store-bought or homemade) – serves as the creamy “filling” for the basket
- 1 cup sweetened shredded coconut – transforms into edible “grass” with a few drops of food coloring
- 4–6 drops green food coloring – tints the coconut for that classic Easter basket look
- 36 mini chocolate eggs or candy-coated Easter eggs – the festive “eggs” nestled in the grass
- Cooking spray or butter – for greasing the muffin pan to prevent sticking
Instructions
1. Preheat and Prepare: Preheat your oven to 350°F (175°C). Lightly grease a standard 12-cup muffin tin with cooking spray or butter.
2. Make the Cookie Dough: In a medium bowl, whisk together the flour, baking soda, and salt. Set aside. In a large bowl, use a hand mixer to cream the softened butter, brown sugar, and granulated sugar until light and fluffy. Add the eggs and vanilla, mixing until well combined. Gradually add the dry ingredients to the wet mixture, mixing until a soft dough forms.
3. Shape the Cookie Cups: Roll tablespoon-sized portions of dough into balls and place one in each muffin cup. Press the dough evenly across the bottom and slightly up the sides of each cavity to form a cup shape. For the most consistent results, use your thumb or the back of a teaspoon to press an indentation into the center.
4. Bake to Perfection: Bake for 10-12 minutes, or until the edges are lightly golden. The centers may puff up slightly – that’s perfectly normal!
5. Reshape While Warm: Immediately after removing the pan from the oven, use the back of a spoon or a small measuring cup to gently press down the centers of each cookie cup again. This step is crucial for creating a deep enough well to hold your frosting and toppings-.
6. Cool Completely: Allow the cookie cups to cool in the pan for about 10 minutes, then carefully transfer them to a wire rack to cool completely. Do not add frosting until they are fully cooled, or the frosting will melt.
7. Make the Coconut Grass: Place the shredded coconut in a zip-top bag, add the green food coloring, and shake until the coconut is evenly tinted.
8. Fill and Decorate: Spoon or pipe the vanilla frosting into the center of each cooled cookie cup. Sprinkle the green coconut over the frosting to resemble grass. Place 2-3 mini candy eggs on top of the coconut to complete the Easter basket look. Let the decorated cups sit for a few minutes before serving so the toppings can set.