
There are days when turning on the oven feels like a chore, yet the craving for something sweet and satisfying still hits. These easy no bake chocolate coconut treats are the answer to that very moment. Imagine a rich, fudgy chocolate base, speckled with sweet, chewy coconut flakes, all coming together in minutes without a single degree of heat from your stove. This recipe is a true lifesaver for busy weeknights, last-minute gatherings, or those afternoons when you just need a little pick-me-up. They are the perfect little bites of joy, versatile enough to dress up for a holiday platter or keep simple for an everyday snack. You will love how these treats deliver on texture and flavor, all from a handful of simple ingredients you probably already have in your pantry.
Recipe Overview
These no bake chocolate coconut treats are the epitome of simplicity and satisfaction. You get a dense, fudgy texture with a delightful chewiness from the shredded coconut, all wrapped in a deep, rich chocolate flavor. This recipe requires no complicated equipment, no baking experience, and comes together in a flash, making it the perfect dessert for anyone, anywhere.
Ingredients List
- 2 cups (about 170g) old-fashioned rolled oats. These provide the hearty, chewy base and structure. Quick oats will work, but rolled oats give a better, more satisfying bite.
- 1 ½ cups sweetened shredded coconut. This is key for that classic tropical flavor and texture. Toasting it first is optional, but it adds a deeper, nutty dimension.
- ½ cup (1 stick) unsalted butter, cubed. This gives the treats their rich, fudgy consistency. Salted butter can be used, but you will want to omit the extra salt.
- ½ cup milk (dairy or unsweetened plant-based). This helps to dissolve the sugar and create a smooth, cohesive mixture.
- ½ cup packed brown sugar. This adds a deep molasses-like sweetness that complements the chocolate beautifully.
- ¼ cup granulated sugar. For the perfect level of sweetness.
- ¼ cup unsweetened cocoa powder. The star of the show, providing the intense chocolate flavor. Use high-quality cocoa for the best results.
- ½ teaspoon vanilla extract. For a warm, aromatic backnote that enhances the chocolate.
- A pinch of salt. To balance the sweetness and elevate all the other flavors.
Step-by-Step Instructions
- Prepare Your Pan: Line an 8×8 inch square baking pan with parchment paper, leaving some overhang on two opposite sides. This will make it incredibly easy to lift the finished treats out for cutting. Set the pan aside.
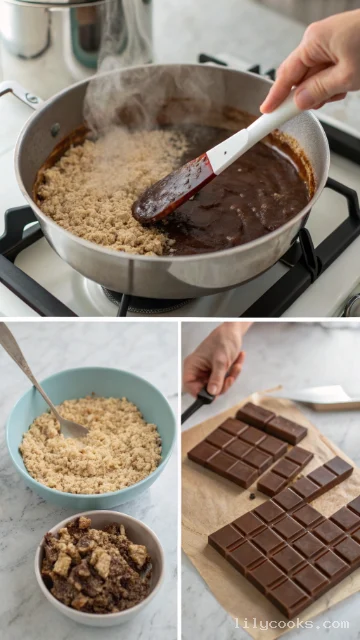
- Combine Dry Ingredients: In a large, heatproof mixing bowl, combine the rolled oats and shredded coconut. Give them a good stir to ensure everything is evenly mixed.
- Create the Chocolate Syrup: In a medium-sized saucepan over medium heat, combine the cubed butter, milk, brown sugar, granulated sugar, cocoa powder, and salt. Stir constantly as the butter melts and the sugars dissolve.
- Boil and Thicken: Bring the mixture to a rolling boil, allowing it to bubble for exactly 1 minute. Do not overcook or undercook this step; the timing is crucial for the final texture as it allows the sugars to properly bind the mixture.
- Combine and Mix: Remove the saucepan from the heat and stir in the vanilla extract. Immediately pour this hot, glossy chocolate syrup over the dry oat and coconut mixture.
- Stir Until Coated: Use a sturdy spatula or wooden spoon to mix everything together. Stir vigorously until all the dry ingredients are completely and evenly coated in the fudgy chocolate syrup. The mixture will be thick and start to clump together.
- Press Into the Pan: Transfer the mixture to the prepared baking pan. Press it down firmly and evenly into the pan. The firmer you press, the better the treats will hold together. An offset spatula or the bottom of a flat measuring cup works wonderfully for this.
- Chill to Set: Place the pan in the refrigerator and let it chill for at least 2 hours, or until the mixture is completely firm and set.
- Slice and Serve: Once firm, use the parchment paper overhang to lift the entire block out of the pan. Place it on a cutting board and slice it into squares or bars.
Tips for Success
The secret to these perfect no bake treats is the boiling time. When you bring the chocolate mixture to a full, rolling boil and let it bubble for that crucial minute, you activate the sugar, ensuring the final texture is fudgy and not grainy. Pressing the mixture firmly into the pan is equally important; this compacts the oats and coconut, guaranteeing a bar that holds its shape and doesn’t crumble when you bite into it. For the cleanest cuts, use a sharp knife and wipe it clean between slices.
Serving Suggestions

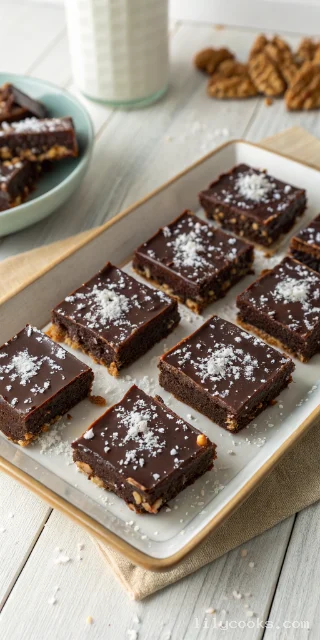
These little squares are wonderful on their own, but a sprinkling of flaky sea salt on top right before they set will send the flavor profile to a gourmet level. For a more decadent presentation, serve them alongside a glass of cold milk, a scoop of vanilla bean ice cream, or a dollop of freshly whipped cream. To transform them into a beautiful holiday dessert, roll them into balls while still warm, then coat them in more toasted coconut or chopped nuts. They look wonderful on a tiered serving platter, a rustic wooden board, or individually wrapped in colorful parchment paper for a charming homemade gift.
Storage Tips
These no bake treats are wonderfully convenient to store. They will keep perfectly in an airtight container at room temperature for up to a week. If your kitchen is particularly warm, you can store them in the refrigerator for up to two weeks, which will give them an even firmer, more fudge-like consistency. They also freeze beautifully; wrap them individually in plastic wrap and place them in a freezer-safe bag, where they will keep for up to 3 months. Enjoy them straight from the freezer for a cool, chewy treat.
Can I make this vegan?
Yes, simply swap the butter for a plant-based version and use your favorite dairy-free milk, like oat or almond milk. These substitutions work perfectly and the treats turn out just as delicious.
My mixture is crumbly and won’t hold together. What happened?
Your chocolate mixture likely didn’t reach a full boil or didn’t boil for the full minute. This step is essential for activating the sugar to bind the ingredients. Try pressing the mixture even more firmly into the pan.
Can I add nuts or other mix-ins?
Absolutely. Chopped walnuts, pecans, or almonds are wonderful additions. You can also add dried cranberries or a handful of chocolate chips for an extra layer of flavor.
Why are my treats dry and hard?
Overcooking the chocolate syrup is the main culprit. If it boils for more than a minute, the sugar can start to crystallize and harden, leading to a dry, crumbly result.
Can I use unsweetened coconut?
You can, but you will likely need to add a little extra sugar to compensate for the loss of sweetness, as the recipe is balanced for sweetened coconut.
Can I make these treats in a different pan?
Yes, an 8×8 pan is ideal, but you can use a 9×9 pan for thinner treats. Just keep in mind the cooking time remains the same. You can also press the mixture into a muffin tin for perfectly portioned, round treats.
Conclusion
This recipe truly is a no-fuss way to create a remarkably delicious treat. They are a perfect reminder that simple ingredients can come together to make something truly special. I hope you give them a try and enjoy every single bite! Once you make them, be sure to come back and leave a star rating and share your results.
easy no bake chocolate coconut treats
These no bake chocolate coconut treats are the epitome of simplicity and satisfaction. You get a dense, fudgy texture with a delightful chewiness from the shredded coconut, all wrapped in a deep, rich chocolate flavor. This recipe requires no complicated equipment, no baking experience, and comes together in a flash, making it the perfect dessert for anyone, anywhere.
Ingredients
- 2 cups (about 170g) old-fashioned rolled oats. These provide the hearty, chewy base and structure. Quick oats will work, but rolled oats give a better, more satisfying bite.
- 1 ½ cups sweetened shredded coconut. This is key for that classic tropical flavor and texture. Toasting it first is optional, but it adds a deeper, nutty dimension.
- ½ cup (1 stick) unsalted butter, cubed. This gives the treats their rich, fudgy consistency. Salted butter can be used, but you will want to omit the extra salt.
- ½ cup milk (dairy or unsweetened plant-based). This helps to dissolve the sugar and create a smooth, cohesive mixture.
- ½ cup packed brown sugar. This adds a deep molasses-like sweetness that complements the chocolate beautifully.
- ¼ cup granulated sugar. For the perfect level of sweetness.
- ¼ cup unsweetened cocoa powder. The star of the show, providing the intense chocolate flavor. Use high-quality cocoa for the best results.
- ½ teaspoon vanilla extract. For a warm, aromatic backnote that enhances the chocolate.
- A pinch of salt. To balance the sweetness and elevate all the other flavors.
Instructions
- Prepare Your Pan: Line an 8x8 inch square baking pan with parchment paper, leaving some overhang on two opposite sides. This will make it incredibly easy to lift the finished treats out for cutting. Set the pan aside.
- Combine Dry Ingredients: In a large, heatproof mixing bowl, combine the rolled oats and shredded coconut. Give them a good stir to ensure everything is evenly mixed.
- Create the Chocolate Syrup: In a medium-sized saucepan over medium heat, combine the cubed butter, milk, brown sugar, granulated sugar, cocoa powder, and salt. Stir constantly as the butter melts and the sugars dissolve.
- Boil and Thicken: Bring the mixture to a rolling boil, allowing it to bubble for exactly 1 minute. Do not overcook or undercook this step; the timing is crucial for the final texture as it allows the sugars to properly bind the mixture.
- Combine and Mix: Remove the saucepan from the heat and stir in the vanilla extract. Immediately pour this hot, glossy chocolate syrup over the dry oat and coconut mixture.
- Stir Until Coated: Use a sturdy spatula or wooden spoon to mix everything together. Stir vigorously until all the dry ingredients are completely and evenly coated in the fudgy chocolate syrup. The mixture will be thick and start to clump together.
- Press Into the Pan: Transfer the mixture to the prepared baking pan. Press it down firmly and evenly into the pan. The firmer you press, the better the treats will hold together. An offset spatula or the bottom of a flat measuring cup works wonderfully for this.
- Chill to Set: Place the pan in the refrigerator and let it chill for at least 2 hours, or until the mixture is completely firm and set.
- Slice and Serve: Once firm, use the parchment paper overhang to lift the entire block out of the pan. Place it on a cutting board and slice it into squares or bars.