

Brighten your day with this classic lemon pie recipe, a perfect balance of zesty tartness and creamy sweetness! This dessert’s silky lemon curd filling and buttery crust make it a crowd-pleaser for any occasion.
Easy to whip up and bursting with fresh citrus flavor, it’s a refreshing treat you’ll want to bake again and again. Let’s dive into this sunny delight!
Recipe Overview

This lemon pie is a dreamy blend of tangy lemon curd and flaky crust, with a creamy texture that melts in your mouth. Ready in about an hour, it’s simple enough for beginners yet impressive for gatherings. The bright, citrusy flavor shines through, making it a perfect dessert for spring or summer.
Preparation Time: 20 minutes
Cooking Time: 40 minutes
Total Time: 1 hour (plus chilling time)
Yield: One 9-inch pie (8 servings)
Ingredients List
- For the Crust:
- 1 ½ cups all-purpose flour (provides structure; spoon and level for accuracy)
- ½ teaspoon salt (enhances flavor)
- ½ cup unsalted butter, cold and cubed (creates a flaky texture; keep cold)
- 4–5 tablespoons ice water (binds dough; add sparingly)
- For the Lemon Filling:
- 1 cup granulated sugar (sweetens without overpowering the tartness)
- ¼ cup cornstarch (thickens the filling for a silky texture)
- ¼ teaspoon salt (balances flavors)
- 1 ½ cups water (helps create a smooth curd)
- ½ cup fresh lemon juice (from 3–4 lemons; fresh is key for vibrant flavor)
- 1 tablespoon lemon zest (adds intense citrus aroma; zest before juicing)
- 4 large egg yolks, room temperature (richens the curd; save whites for meringue if desired)
- 2 tablespoons unsalted butter (adds creaminess to the filling)
- For Garnish (Optional):
- Whipped cream (for a light, fluffy topping)
- Lemon zest or slices (for a pop of color and flavor)
Notes: Use fresh lemons for the brightest flavor; bottled juice lacks the same zing. Room-temperature egg yolks blend more smoothly into the curd.
Step-by-Step Instructions
- Make the Crust: In a large bowl, mix flour and salt. Cut in cold butter with a pastry cutter or fork until the mixture resembles coarse crumbs. Add ice water, 1 tablespoon at a time, mixing until dough forms. Shape into a disk, wrap in plastic, and chill for 30 minutes.
- Roll and Bake Crust: Preheat oven to 375°F (190°C). On a floured surface, roll dough into a 12-inch circle. Fit into a 9-inch pie dish, trim excess, and crimp edges. Prick the bottom with a fork. Line with parchment and fill with pie weights. Bake for 15 minutes, remove weights, and bake 10 more minutes until golden. Cool slightly.
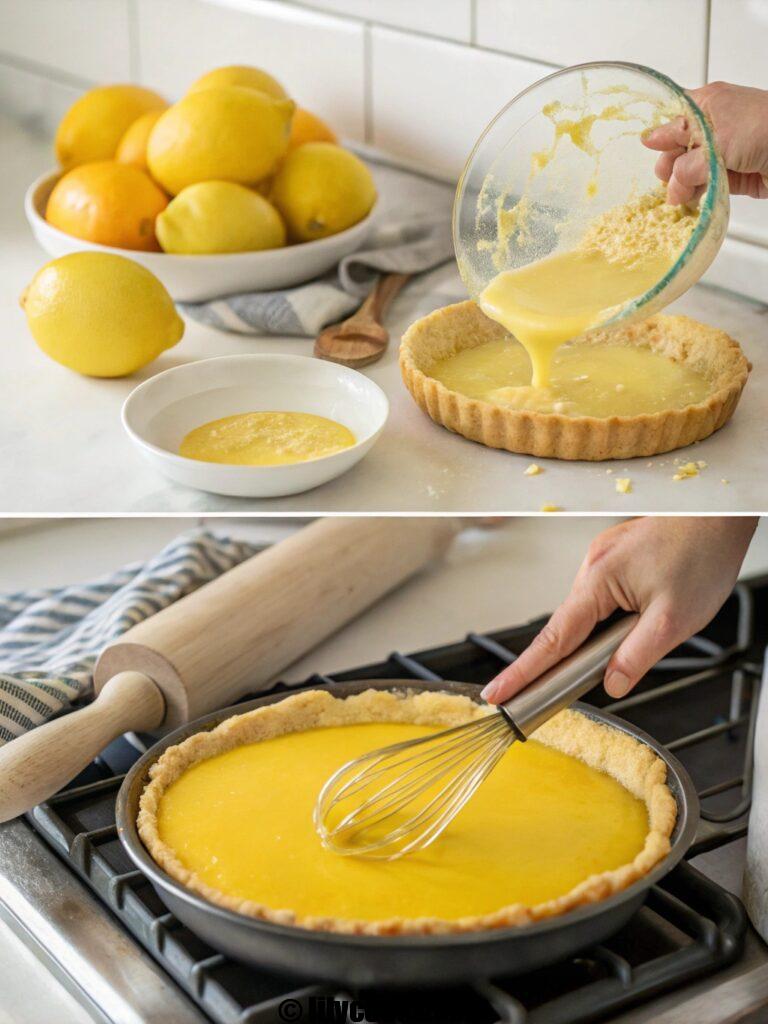
- Prepare Lemon Filling: In a medium saucepan, whisk sugar, cornstarch, and salt. Stir in water, lemon juice, and lemon zest. Cook over medium heat, stirring constantly, until thickened and bubbly, about 5 minutes.
- Temper Egg Yolks: In a small bowl, whisk egg yolks. Gradually whisk in ½ cup of the hot lemon mixture to temper. Pour yolk mixture back into the saucepan, stirring constantly. Cook 2 more minutes until thick. Remove from heat and stir in butter until melted.
- Assemble and Bake: Pour warm lemon filling into the baked crust. Bake for 10–12 minutes until the filling is set but slightly jiggly in the center. Cool to room temperature, then chill for at least 2 hours.
- Garnish and Serve: Top with whipped cream and lemon zest or slices, if desired, before serving.
Tips for Success
- Keep Butter Cold: Cold butter ensures a flaky crust. Chill the dough if it softens during rolling.
- Zest Carefully: Zest only the yellow part of the lemon peel to avoid bitter pith.
- Temper Eggs Slowly: Add hot liquid gradually to egg yolks to prevent scrambling.
- Check for Doneness: The filling should jiggle slightly in the center when baked; it will set fully as it chills.
- Avoid Overbaking: Overcooking the filling can make it grainy. Watch closely in the final minutes.
Serving Suggestions

Serve this lemon pie chilled for a refreshing treat, paired with a glass of iced tea or sparkling lemonade to enhance its citrusy zing. For a decadent touch, pipe whipped cream swirls on top or sprinkle with extra lemon zest for a vibrant look. Pair with fresh berries like raspberries or blueberries for a colorful contrast. For gatherings, slice into even wedges and serve on pretty plates for an elegant presentation.
Storage Tips
- Room Temperature: Keep at room temperature for up to 2 hours during serving.
- Refrigeration: Store covered in the fridge for up to 4 days. Cover tightly to prevent absorbing fridge odors.
- Freezing: Freeze the baked pie (without whipped cream) for up to 2 months. Wrap tightly in plastic wrap and foil. Thaw in the fridge overnight before serving.
- Tip: Add whipped cream garnish just before serving to maintain its fluffiness.
FAQs
Can I use bottled lemon juice?
Fresh lemon juice is best for bright flavor, but bottled can work in a pinch; use high-quality, 100% juice.
What can I substitute for cornstarch?
Arrowroot powder or tapioca starch can replace cornstarch in equal amounts, but texture may vary slightly.
Can I make this pie crustless?
Yes, bake the filling in a greased ramekin for a gluten-free lemon custard. Reduce baking time slightly.
Why did my filling crack?
Overbaking or rapid cooling can cause cracks. Bake until just set and cool gradually.
Can I add meringue instead of whipped cream?
Absolutely! Use the reserved egg whites to make a meringue topping and bake until golden.
Conclusion
This classic lemon pie is a burst of sunshine on a plate, with its zesty filling and buttery crust. It’s simple to make and sure to impress. Bake it, share it, and let us know how it turned out in the comments!
indulge in chocolate pecan ooey gooey butter cake recipe

This honey mustard chicken salad brings together succulent grilled chicken breasts coated in a luscious homemade honey mustard dressing, tossed with fresh salad greens, crunchy vegetables, and creamy avocado. The preparation takes just 15 minutes of active work, making it perfect for busy home cooks. The flavor profile strikes that ideal balance – the honey provides natural sweetness while Dijon mustard adds a pleasant sharpness, and a splash of apple cider vinegar brightens everything up. This chicken salad recipe works beautifully as a main course, sandwich filling, or even a wrap stuffing.
Ingredients
- ½ cup Greek yogurt (plain, full-fat for creaminess)
- 3 tablespoons Dijon mustard (adds that characteristic sharp bite)
- 2 tablespoons honey (use local honey for the best floral notes)
- 1 tablespoon apple cider vinegar (brings essential acidity to balance)
- 1 clove garlic, minced (fresh garlic makes all the difference)
- ½ teaspoon salt
- ¼ teaspoon black pepper
- 2 tablespoons olive oil (extra virgin for richer flavor)
- For the Chicken:
- 2 boneless, skinless chicken breasts (about 6 ounces each)
- 1 tablespoon olive oil
- ½ teaspoon salt
- ¼ teaspoon black pepper
- ½ teaspoon garlic powder
- For the Salad:
- 6 cups mixed salad greens (spring mix or romaine works beautifully)
- 1 cup cherry tomatoes, halved
- 1 avocado, diced
- ¼ red onion, thinly sliced
- ½ cup candied pecans or walnuts
- ¼ cup dried cranberries (adds sweet-tart pops of flavor)
Instructions
- Make the Honey Mustard Dressing: Whisk together the Greek yogurt, Dijon mustard, honey, apple cider vinegar, minced garlic, salt, and pepper in a medium bowl until smooth and creamy. Slowly drizzle in the olive oil while continuing to whisk – this emulsifies the dressing, creating a silky texture that clings perfectly to every ingredient. Set aside ¼ cup of the dressing for tossing the salad and reserve the rest for drizzling over the finished dish.
- Prepare the Chicken: Pat the chicken breasts dry with paper towels – moisture prevents proper browning. Drizzle with olive oil and season both sides generously with salt, pepper, and garlic powder. Let the chicken sit at room temperature for about 10 minutes before cooking, which helps it cook more evenly.
- Cook the Chicken: Heat a grill pan or cast-iron skillet over medium-high heat. Place the chicken breasts in the hot pan, cooking for 5-6 minutes on the first side until golden brown grill marks appear. Flip and cook for another 4-5 minutes, depending on thickness. The chicken is done when an instant-read thermometer registers 165°F (74°C) in the thickest part. Remove from heat and let rest on a cutting board for 5-8 minutes – this crucial step allows the juices to redistribute throughout the meat, ensuring each slice stays moist and tender.
- Assemble the Base: While the chicken rests, arrange the mixed salad greens in a large serving bowl or divide among individual plates. Scatter the cherry tomato halves, diced avocado, thinly sliced red onion, candied pecans, and dried cranberries over the greens. The avocado adds creamy richness, the red onion provides a sharp kick, and the pecans contribute a satisfying crunch that contrasts beautifully with the tender chicken.
- Slice and Dress the Chicken: Slice the rested chicken breasts against the grain into ½-inch thick strips – cutting against the grain shortens the muscle fibers, making each piece easier to chew and more tender. Place the sliced chicken directly on top of the assembled salad.
- Finish and Serve: Drizzle the reserved honey mustard dressing over the chicken and salad, or serve it on the side. Toss gently to combine just before eating – you want the dressing to coat everything evenly without wilting the greens. Serve immediately while the chicken still has that fresh-off-the-pan warmth.