

Nothing beats the comforting aroma of chicken noodle soup simmering on the stove—a timeless dish that warms the soul and brings back memories of cozy evenings. This classic chicken noodle soup recipe is your go-to for a quick, flavorful meal that’s perfect for chilly days, sick days, or any time you crave something hearty yet simple.
With tender chicken, slurp-worthy noodles, and a savory broth infused with fresh herbs, this recipe is easy to make, endlessly versatile, and sure to become a family favorite. Ready to dive into a bowl of pure comfort? Let’s get cooking!
Recipe Overview

Preparation Time: 15 minutes
Cooking Time: 30 minutes
Total Time: 45 minutes
Servings: 4-6
Ingredients List
- 1 tbsp olive oil or butter: Olive oil keeps it light, while butter adds a rich, cozy depth.
- 1 medium onion, diced: Yellow or sweet onions provide a subtle sweetness to balance the broth.
- 2 medium carrots, sliced: Adds color, crunch, and natural sweetness.
- 2 celery stalks, sliced: Brings a fresh, earthy flavor to the soup base.
- 2 garlic cloves, minced: Infuses the broth with warm, aromatic depth.
- 8 cups chicken broth (low-sodium): Use store-bought or homemade for a rich, savory foundation.
- 2 cups cooked, shredded chicken: Rotisserie chicken saves time; poached chicken breast works for freshness.
- 2 cups egg noodles: Classic choice for a hearty, slurp-worthy texture.
- 1 tsp dried thyme: Adds a warm, herbal note that complements the chicken.
- 1 bay leaf: Enhances the broth with a subtle, aromatic flavor.
- Salt and pepper to taste: Adjust to your preference for a perfectly seasoned soup.
- 1 tbsp fresh lemon juice (optional): Brightens the flavors with a fresh, tangy kick.
- Fresh parsley, chopped (optional): Adds a pop of color and fresh, herbaceous finish.
Note: Fresh ingredients like parsley and lemon juice elevate the dish, while high-quality broth ensures a robust flavor. If using store-bought broth, low-sodium lets you control the saltiness.
Step-by-Step Instructions
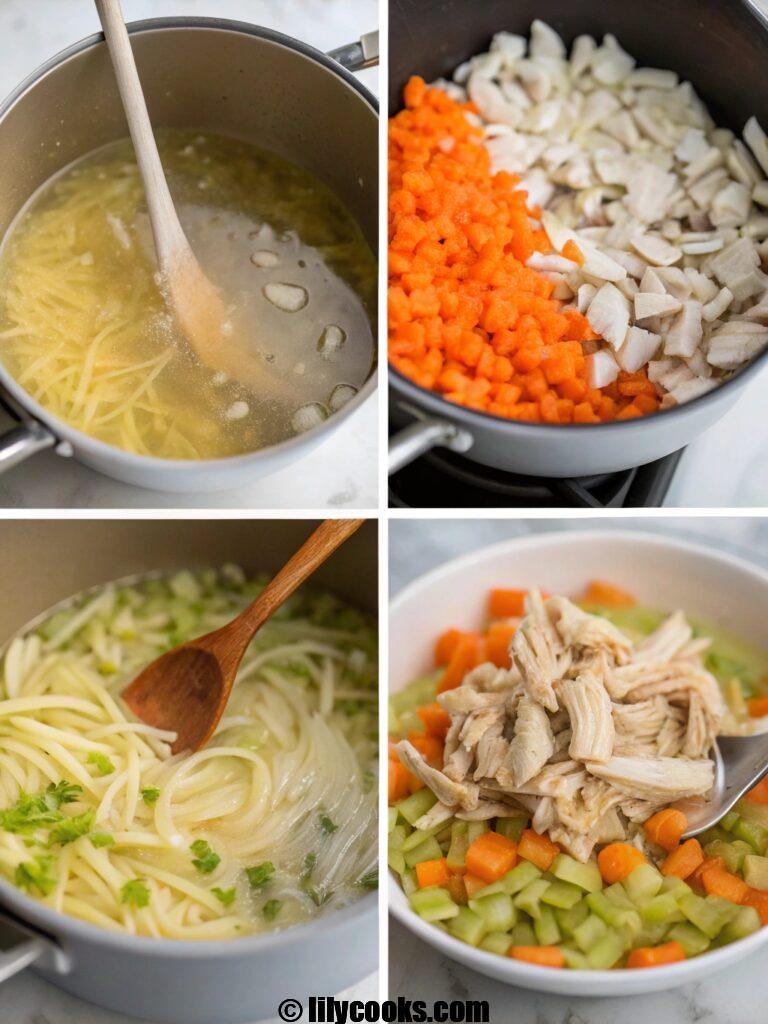
- Sauté the Vegetables: Heat 1 tbsp olive oil or butter in a large pot over medium heat. Add diced onion, sliced carrots, and celery. Cook for 5-7 minutes, stirring occasionally, until the vegetables soften and release their sweet, earthy aroma. Add minced garlic and cook for 1 minute until fragrant, being careful not to burn it. Tip: Cutting vegetables into uniform sizes ensures even cooking.
- Build the Broth: Pour in 8 cups of chicken broth, then add dried thyme, bay leaf, a pinch of salt, and pepper. Stir well and bring to a gentle boil. Reduce heat to a simmer and let the flavors meld for 5 minutes. Tip: A low simmer keeps the broth clear and prevents it from becoming cloudy.
- Cook the Noodles: Add 2 cups of egg noodles to the simmering broth. Cook for 8-10 minutes (or per package instructions) until al dente, stirring occasionally to prevent sticking. Tip: If you prefer a brothier soup, add an extra cup of broth, as noodles absorb liquid.
- Add the Chicken: Stir in 2 cups of shredded chicken and heat through for 2-3 minutes. If using lemon juice, stir it in now for a bright, zesty lift. Tip: Rotisserie chicken adds a slightly smoky flavor, while freshly poached chicken keeps it light.
- Finish and Serve: Remove the bay leaf. Taste and adjust seasoning with additional salt or pepper if needed. Ladle into bowls, garnish with chopped parsley for a fresh touch, and serve piping hot. Tip: A sprinkle of parsley not only looks beautiful but adds a burst of flavor.
Tips for Success
- Choose Quality Broth: Homemade or low-sodium store-bought broth ensures a clean, rich flavor without overpowering saltiness.
- Don’t Overcook Noodles: Cook noodles just until al dente to avoid mushy texture, especially if storing leftovers.
- Shred Chicken Evenly: Uniform pieces ensure every bite has tender chicken. Use two forks or your hands for quick shredding.
- Add Lemon Sparingly: A small splash of lemon juice brightens the soup without making it too tangy—taste as you go.
- Customize Veggies: Feel free to add zucchini, peas, or spinach for extra nutrition and color.
Serving Suggestions

Storage Tips
- Room Temperature: Let the soup cool to room temperature (no more than 2 hours) before storing to prevent bacterial growth.
- Refrigeration: Store in an airtight container in the fridge for up to 3 days. Note that noodles may absorb broth, so you might need to add extra broth when reheating.
- Freezing: Freeze without noodles in airtight containers for up to 3 months. When ready to serve, reheat and add freshly cooked noodles to maintain texture. Tip: Portion into single-serving containers for easy reheating.
FAQs
Can I use gluten-free noodles?
Yes, swap egg noodles for gluten-free pasta or rice noodles. Adjust cooking time per package instructions to avoid mushiness.
Can I make this in a slow cooker?
Absolutely! Sauté vegetables first, then add all ingredients except noodles to a slow cooker. Cook on low for 6-8 hours or high for 3-4 hours. Add noodles in the last 20 minutes.
What if I don’t have fresh herbs?
Dried parsley or a pinch of dried dill works fine. Use half the amount of fresh herbs to avoid overpowering the soup.
Can I use raw chicken?
Yes, add boneless chicken breasts or thighs to the simmering broth in step 2. Cook for 15-20 minutes, remove, shred, and return to the pot.
How can I make it vegetarian?
Swap chicken broth for vegetable broth and omit chicken. Add extra veggies like mushrooms or tofu for heartiness.
Conclusion
This chicken noodle soup is more than just a meal—it’s a hug in a bowl, perfect for any occasion. With its rich, savory broth and tender ingredients, it’s a recipe you’ll turn to again and again. Grab your pot, gather your ingredients, and whip up this classic dish tonight.
Share your cozy creations with us in the comments or tag us on social media—we’d love to see your steaming bowls of comfort!
Korean beef bowls
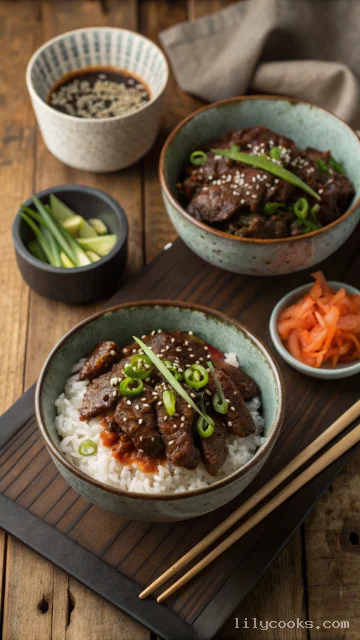
This dish is all about big, bold flavors with minimal effort. The beef is cooked until perfectly browned, then coated in a luscious sauce made with soy sauce, brown sugar, garlic, and a kick of ginger. The result is a deeply savory and slightly sweet filling that has a wonderful, sticky texture. It’s a quick and easy meal, coming together in just about 20 minutes, making it perfect for those evenings when you need a delicious dinner on the table fast.
Ingredients
- 1 pound ground beef (80/20): This fat content ensures the beef stays juicy and flavorful as it cooks.
- 1 pound ground beef (80/20): This fat content ensures the beef stays juicy and flavorful as it cooks.
- 1 tablespoon sesame oil: It provides a nutty, toasted aroma that is foundational to Korean cooking.
- 1 tablespoon sesame oil: It provides a nutty, toasted aroma that is foundational to Korean cooking.
- 4 cloves garlic, minced: Fresh garlic is key for that pungent, aromatic kick.
- 4 cloves garlic, minced: Fresh garlic is key for that pungent, aromatic kick.
- 1 teaspoon fresh ginger, grated: Ginger adds a bright, slightly spicy warmth. Pre-minced ginger works, but fresh is more vibrant.
- 1 teaspoon fresh ginger, grated: Ginger adds a bright, slightly spicy warmth. Pre-minced ginger works, but fresh is more vibrant.
- 1/4 cup brown sugar, packed: This adds the perfect amount of sweetness to balance the salty soy sauce.
- 1/4 cup brown sugar, packed: This adds the perfect amount of sweetness to balance the salty soy sauce.
- 1/4 cup low-sodium soy sauce: Using low-sodium allows you to control the salt level. Regular soy sauce will work, but you may want to use a little less.
- 1/4 cup low-sodium soy sauce: Using low-sodium allows you to control the salt level. Regular soy sauce will work, but you may want to use a little less.
- 2 tablespoons gochujang (Korean chili paste): This is what gives the dish its signature depth and a subtle, satisfying heat. If you don't have it, you can substitute with 1 tablespoon of sriracha.
- 2 tablespoons gochujang (Korean chili paste): This is what gives the dish its signature depth and a subtle, satisfying heat. If you don't have it, you can substitute with 1 tablespoon of sriracha.
- 1 tablespoon rice vinegar: A touch of acidity brightens up all the flavors.
- 1 tablespoon rice vinegar: A touch of acidity brightens up all the flavors.
- For serving:
- For serving:
- Cooked white rice (steamed jasmine or short-grain rice)
- Cooked white rice (steamed jasmine or short-grain rice)
- Sesame seeds, for garnish
- Sesame seeds, for garnish
- Sliced green onions
- Sliced green onions
- Optional toppings: shredded carrots, cucumber ribbons, or a fried egg
- Optional toppings: shredded carrots, cucumber ribbons, or a fried egg
Instructions
- Prepare the Sauce: In a small bowl, whisk together the brown sugar, soy sauce, gochujang, rice vinegar, and grated ginger. Set this flavorful mixture aside. This simple step is where all the magic begins.
- Brown the Beef: Place a large skillet or wok over medium-high heat and add the sesame oil. Once the oil is shimmering, add the ground beef. Cook, breaking it apart with a wooden spoon, until it is beautifully browned and no longer pink, about 5-7 minutes. Do not drain the fat; it holds a ton of flavor.
- Aromatics: Add the minced garlic to the skillet and cook for another 1-2 minutes until it becomes incredibly fragrant. The kitchen will start to smell absolutely divine.
- Combine and Simmer: Pour the prepared sauce over the cooked beef. Stir everything together to ensure the meat is fully coated. Reduce the heat to medium-low and let it simmer for 3-4 minutes. You’ll see the sauce thicken and become glossy and sticky, clinging to every piece of beef.
- Assemble the Bowls: To serve, place a generous scoop of warm, steamed rice in each bowl. Top with a large portion of the saucy Korean beef. Garnish with a sprinkle of sesame seeds and fresh green onions.
- Add Your Toppings: Get creative! Add some crunchy shredded carrots, cool cucumber ribbons, or for a decadent touch, a perfectly fried egg with a runny yolk.
Tips for Success
- Use Fresh Ginger: While ground ginger can work in a pinch, freshly grated ginger has a bright, zesty flavor that really elevates this dish.
- Don't Overcook the Beef: Cook the beef until it's just browned. Overcooking can make it dry and tough. We want it tender and juicy.
- Adjust the Heat: Gochujang has a fantastic flavor, but its spice level can vary. Start with 1 1/2 tablespoons if you're sensitive to heat and add more to taste.
- Make it Saucy: If you prefer a saucier bowl, add a splash of water or beef broth to the skillet along with the sauce. It will still thicken beautifully.