
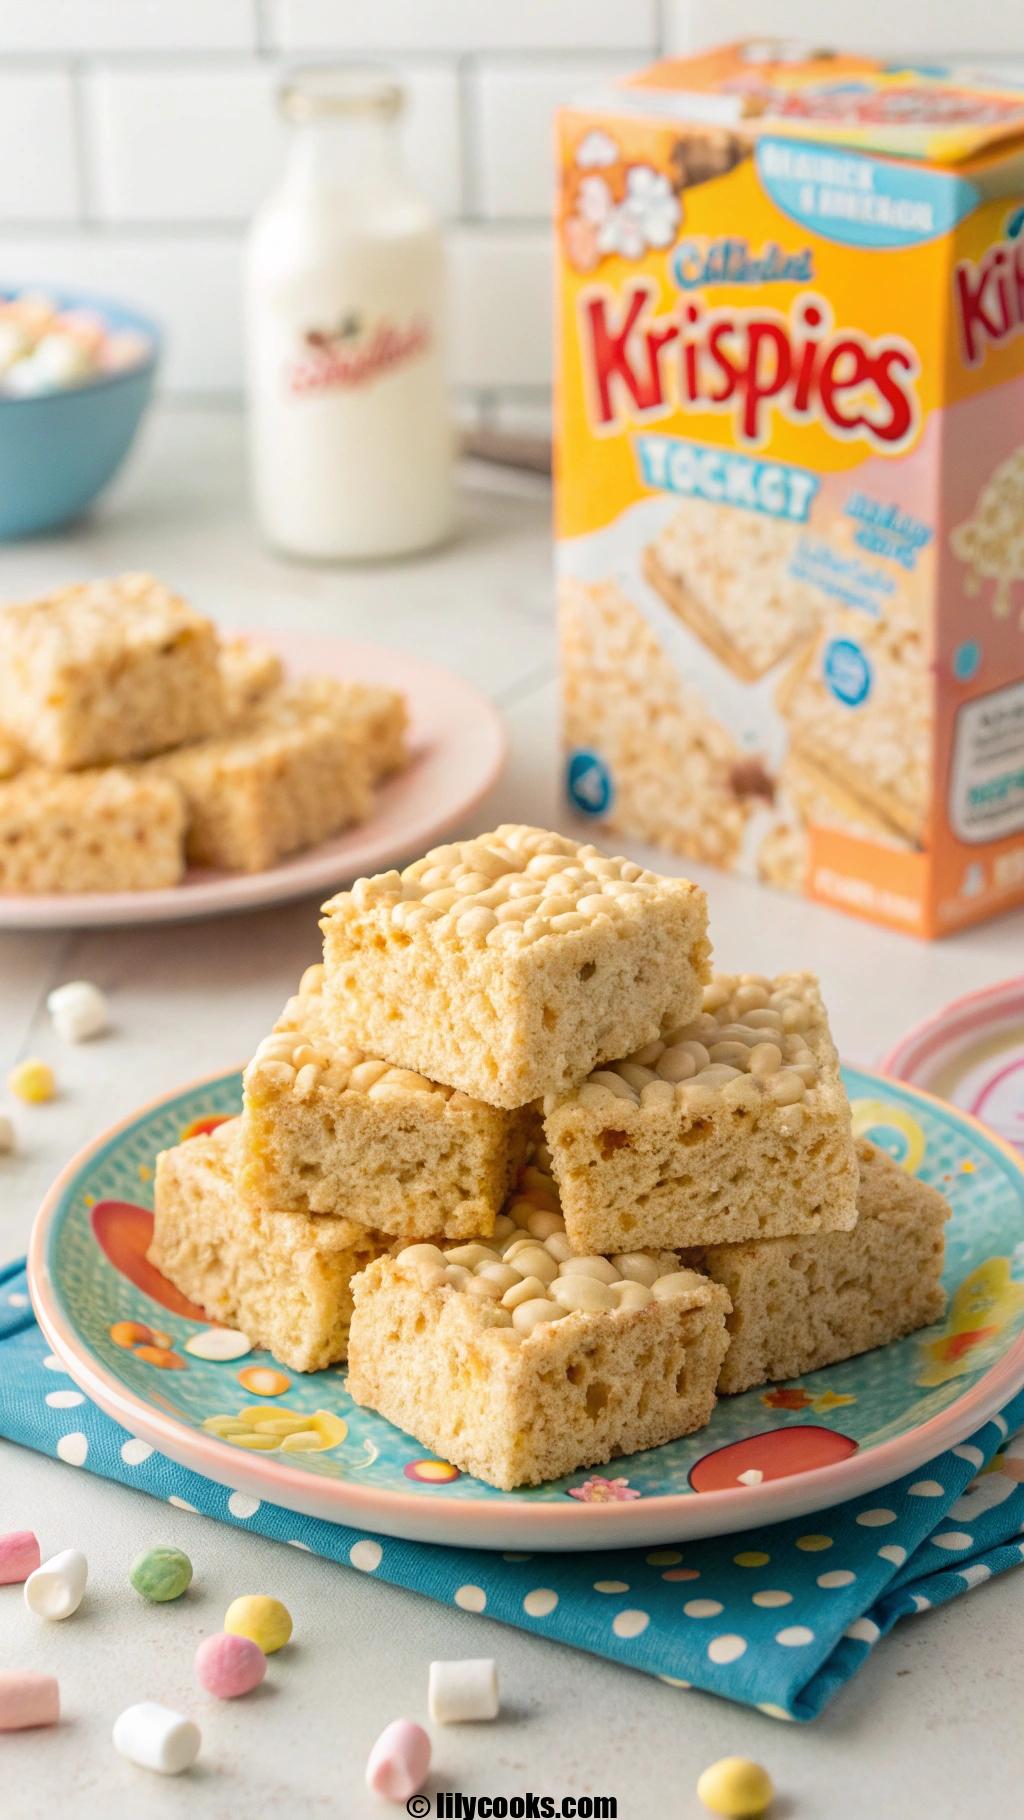
Craving a sweet, chewy treat that brings back childhood memories? These Classic Rice Krispies Treats are the ultimate no-bake dessert, blending crispy cereal with gooey marshmallows for a perfect balance of crunch and melt-in-your-mouth goodness..
Quick to make and endlessly versatile, they’re ideal for lunchboxes, parties, or a cozy snack. With just three ingredients, you’ll create a batch of these iconic treats that everyone will love. Let’s get started!

Recipe Overview
These Classic Rice Krispies Treats are all about simplicity and satisfaction. The crispy cereal delivers a satisfying snap, while melted marshmallows create a soft, chewy texture. Ready in under 20 minutes, this beginner-friendly recipe requires minimal ingredients and no oven, making it perfect for quick desserts or last-minute gatherings.
Preparation Time: 10 minutes
Cooking Time: 5 minutes
Total Time: 15 minutes
Servings: 12 squares
Ingredients List
- 6 cups Rice Krispies cereal: The star of the show, providing that iconic crisp texture. Kellogg’s brand ensures the best crunch, but generic works too.
- 4 cups mini marshmallows: Fresh marshmallows melt smoothly for that gooey, stretchy texture. Avoid stale ones for best results.
- 3 tablespoons unsalted butter: Adds rich flavor and helps bind the treats. Use room-temperature butter for even melting.
Note: Quality matters! Fresh marshmallows ensure a smooth melt, and real butter adds depth. Stick with the classic Rice Krispies for authentic flavor, though gluten-free versions work for dietary needs.
Step-by-Step Instructions
- Prepare the Pan: Line an 8×8-inch or 9×9-inch baking dish with parchment paper, leaving overhang for easy removal. Lightly grease with butter or non-stick spray to prevent sticking.
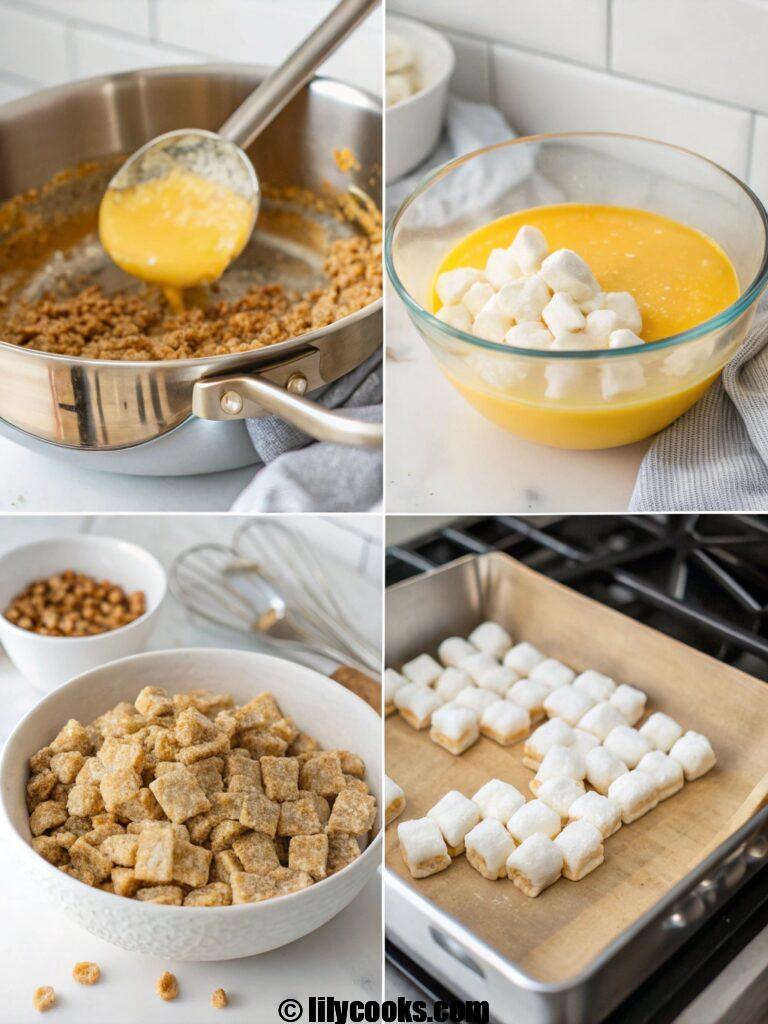
- Melt Butter: In a large saucepan over low heat, melt the butter until smooth and golden, about 1-2 minutes. Low heat prevents browning for a clean flavor.
- Add Marshmallows: Stir in the mini marshmallows and cook, stirring constantly, until fully melted and smooth, about 3-4 minutes. The mixture should be glossy and stretchy, like a sweet, creamy cloud.
- Mix in Cereal: Remove the pan from heat. Add Rice Krispies cereal and gently fold until evenly coated. Work quickly to keep the mixture pliable and avoid hardening.
- Press into Pan: Transfer the mixture to the prepared baking dish. Using a greased spatula or lightly dampened hands, press it evenly into the pan. Apply gentle pressure to keep the treats light and chewy—don’t compact too hard!
- Cool and Cut: Let the treats cool at room temperature for 10-15 minutes. Lift out using the parchment overhang and cut into 12 squares with a sharp knife. Enjoy the satisfying crunch as you slice!
Tips for Success
- Use Fresh Marshmallows: Stale marshmallows melt unevenly, leading to a grainy texture. Check the bag’s expiration date for best results.
- Keep Heat Low: Melting butter and marshmallows on low heat prevents burning and ensures a smooth, creamy base.
- Don’t Overpress: Press the mixture gently into the pan to maintain a light, airy texture. Too much pressure creates dense, hard treats.
- Grease Tools: Lightly grease your spatula or hands to prevent sticking when pressing the mixture into the pan.
- Cut Cleanly: Use a sharp knife for neat squares. Warm the knife under hot water and dry it for even cleaner cuts.
Serving Suggestions
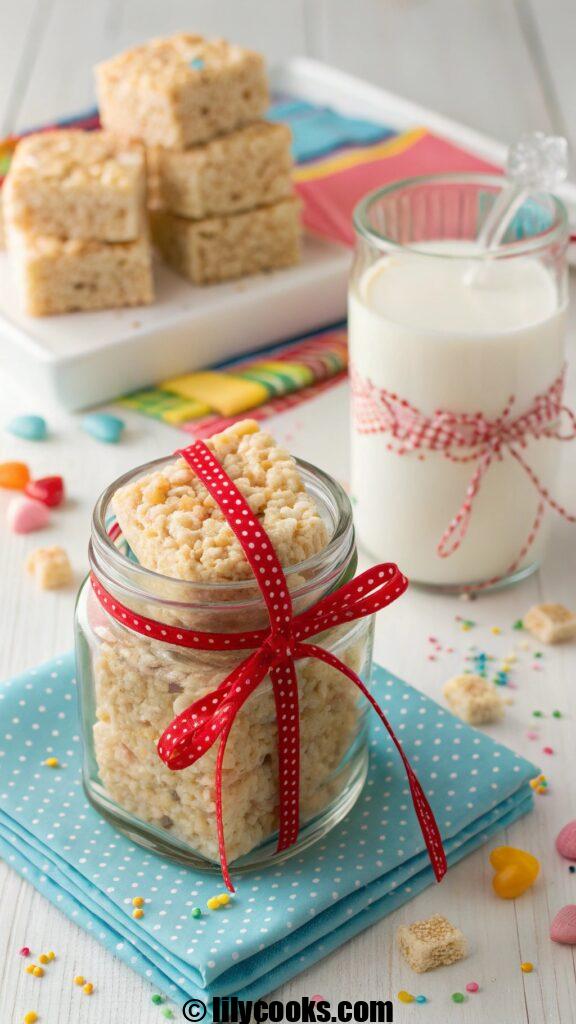
Serve these Rice Krispies Treats on a playful platter for kids’ parties or as a sweet addition to a dessert table. Pair with a glass of cold milk for a classic combo that enhances the treats’ sweet, buttery flavor. For a fun twist, drizzle with melted chocolate or sprinkle with colorful sprinkles before cooling. Stack them in a mason jar tied with a ribbon for a charming gift or party favor.
Storage Tips
- Room Temperature: Store in an airtight container for up to 3 days to maintain crispness. Keep in a cool, dry place.
- Refrigeration: Refrigerate in an airtight container for up to 1 week. Let sit at room temperature for 10 minutes before serving to soften slightly.
- Freezing: Wrap individual squares tightly in plastic wrap, then place in a freezer-safe bag for up to 1 month. Thaw at room temperature for 10-15 minutes before enjoying.
FAQs
Can I use large marshmallows instead of mini?
Yes, but mini marshmallows melt faster and more evenly. If using large ones, chop them into smaller pieces for better results.
Can I add mix-ins like chocolate chips?
Absolutely! Stir in ½ cup of chocolate chips or sprinkles after adding the cereal for extra flavor and fun.
How do I make these gluten-free?
Use gluten-free Rice Krispies or a similar cereal. Ensure all other ingredients are gluten-free certified.
Why are my treats too sticky?
Too many marshmallows or under-mixing can cause stickiness. Measure carefully and ensure the cereal is fully coated.
Can I use margarine instead of butter?
Butter is best for flavor, but margarine works in a pinch. Choose a high-quality spread for similar richness.
Conclusion
These Classic Rice Krispies Treats are a quick, nostalgic treat that never fails to delight. With their crispy snap and gooey sweetness, they’re perfect for any occasion. Grab your ingredients, make a batch, and share the joy with friends and family. Let us know how yours turn out!
strawberry honeybun cake recipe
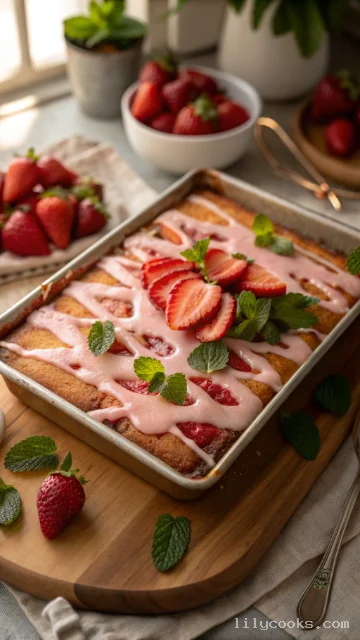
This Strawberry Honeybun Cake starts with a boxed cake mix, making it incredibly approachable for bakers of all skill levels. The addition of sour cream and cream cheese creates an exceptionally moist and tender texture, while a hidden layer of brown sugar and cinnamon provides that classic honeybun swirl we all love. A simple strawberry glaze drizzled on top adds the perfect finishing touch—sweet, fruity, and irresistibly pretty. It’s an easy, foolproof dessert that tastes like you spent hours in the kitchen.
Ingredients
- 1 box (15.25 oz) strawberry cake mix – This forms the flavorful base of our cake, providing that perfect strawberry taste without any extra fuss.
- 1 (3.4 oz) box strawberry instant pudding mix – This is a secret weapon for extra moisture and a more intense strawberry flavor. It also helps create a softer, more tender crumb.
- 4 large eggs, at room temperature – Room-temperature eggs blend more easily into the batter, creating a smoother, more uniform texture. They also provide essential structure.
- 1 cup sour cream, at room temperature – Sour cream is the key to an incredibly moist and tender cake. Its tangy flavor also beautifully balances the sweetness of the strawberries and glaze.
- ½ cup vegetable oil – Oil ensures the cake stays supremely moist for days, much more so than butter alone.
- ¼ cup whole milk – Adds just the right amount of liquid to achieve a smooth, pourable batter.
- 1 teaspoon vanilla extract – A splash of vanilla enhances all the other flavors, making the strawberry and cinnamon notes pop.
- For the Cinnamon Swirl:
- ½ cup brown sugar, packed – Brown sugar gives the swirl a deep, caramel-like sweetness that mimics the flavor of a classic honeybun.
- ¼ cup granulated white sugar – Provides a bit of extra sweetness and helps create a lovely, slightly crunchy texture in the swirl.
- 1 tablespoon ground cinnamon – This is the warm, aromatic spice that defines the honeybun experience.
- For the Strawberry Glaze:
- 1 cup powdered sugar – The base for our smooth, sweet glaze.
- 2 tablespoons strawberry jam or preserves – This gives the glaze its beautiful pink color and a concentrated burst of strawberry flavor.
- 1-2 tablespoons milk – Use just enough to thin the glaze to a perfect drizzling consistency.
- ½ teaspoon vanilla extract – A final touch of warmth for the glaze.
Instructions
- Preheat and Prepare: Preheat your oven to 350°F (175°C). Grease a 9x13-inch baking pan with butter or non-stick spray, then lightly dust it with flour to ensure your cake releases perfectly-1.
- Make the Cinnamon Swirl: In a small bowl, whisk together the brown sugar, granulated sugar, and ground cinnamon until well combined. Set this aside for later-1.
- Mix the Cake Batter: In a large mixing bowl, combine the strawberry cake mix, strawberry pudding mix, eggs, sour cream, vegetable oil, milk, and vanilla extract-1. Beat with an electric mixer on medium speed until the batter is smooth and well combined, about 2 minutes. Be careful not to overmix-12.
- Layer the Batter: Pour half of the cake batter into the prepared pan and spread it evenly with a spatula. Sprinkle the entire cinnamon-sugar mixture evenly over the batter-1.
- Add the Remaining Batter: Pour the remaining cake batter over the cinnamon layer. Gently spread it to cover the swirl, being careful not to mix the layers too much. Use a knife or skewer to lightly swirl the cinnamon mixture into the top layer of batter for a marbled effect-1.
- Bake: Place the pan in the preheated oven and bake for 35-40 minutes. The cake is done when a toothpick inserted into the center comes out clean or with just a few moist crumbs attached-1.
- Make the Glaze: While the cake is baking, prepare the glaze. In a small bowl, whisk together the powdered sugar, strawberry jam, milk, and vanilla extract until smooth and pourable-1.
- Glaze and Cool: Remove the cake from the oven and let it cool in the pan on a wire rack for about 10-15 minutes-3. While the cake is still warm, drizzle the strawberry glaze evenly over the top. The warmth of the cake will help the glaze set into a beautiful, glossy finish-12. Allow the cake to cool completely before slicing and serving.