
Nothing warms the soul like a steaming bowl of chili on a crisp evening. This hearty chili recipe bursts with bold, smoky flavors and tender textures, making it the ultimate comfort food for family dinners, game-day gatherings, or cozy nights in.
Versatile and easy to customize, it’s a dish everyone will love, from spice enthusiasts to picky eaters. Let’s dive into this simple yet irresistible recipe that’s sure to become a staple in your kitchen.
Recipe Overview
This chili recipe delivers a rich, savory blend of ground beef, beans, and aromatic spices with a touch of heat. It’s thick, hearty, and perfect for spooning over cornbread or topping with creamy cheese. Ready in under an hour, it’s ideal for busy weeknights or leisurely weekend cooking. The balance of smoky cumin, tangy tomatoes, and optional jalapeño heat creates a crowd-pleasing dish that’s as satisfying to make as it is to eat.
Preparation Time: 15 minutes
Cooking Time: 45 minutes
Total Time: 1 hour
Servings: 6-8
Ingredients List
- 1.5 lbs ground beef (80/20 for rich flavor; leaner options work too)
- 1 large yellow onion, diced (adds sweetness and depth)
- 3 cloves garlic, minced (fresh for bold aroma)
- 1 red bell pepper, diced (for color and subtle sweetness)
- 1 jalapeño, seeded and diced (optional, for heat; keep seeds for extra spice)
- 2 (15 oz) cans kidney beans, drained and rinsed (hearty texture)
- 1 (15 oz) can black beans, drained and rinsed (variety in flavor)
- 1 (28 oz) can crushed tomatoes (rich base; fire-roasted for smoky depth)
- 1 (15 oz) can diced tomatoes, undrained (chunky texture)
- 2 tbsp tomato paste (intensifies tomato flavor)
- 2 cups beef broth (enhances savory notes; low-sodium to control salt)
- 2 tbsp chili powder (key for bold, warm flavor)
- 1 tbsp ground cumin (earthy, smoky undertone)
- 1 tsp smoked paprika (deep, smoky nuance)
- 1 tsp dried oregano (herbal balance)
- 1 tsp brown sugar (optional, to mellow acidity)
- Salt and black pepper, to taste
- 2 tbsp olive oil (for sautéing)
- Optional toppings: shredded cheddar, sour cream, chopped green onions, cilantro, avocado slices
Notes: Fresh garlic and onion elevate the dish over pre-chopped versions. Canned beans save time but retain hearty texture. Fire-roasted tomatoes add a smoky edge, perfect for chili lovers.
Step-by-Step Instructions
- Prep Ingredients: Dice onion, bell pepper, and jalapeño; mince garlic. Drain and rinse beans. Having everything ready streamlines cooking.
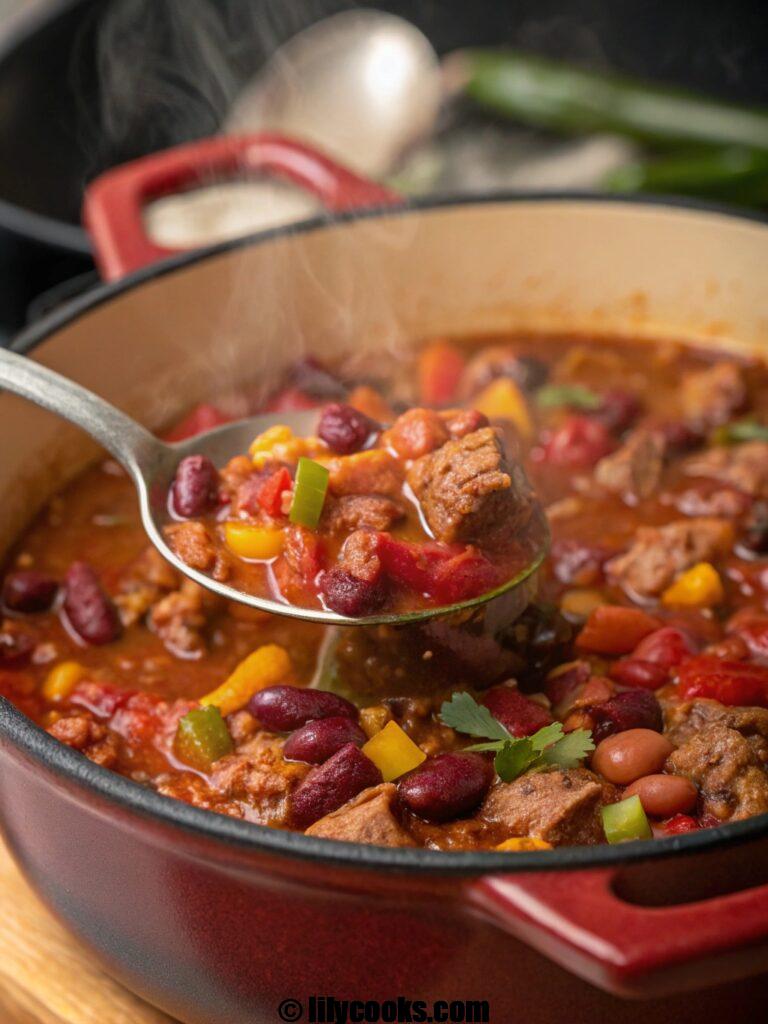
- Brown the Beef: Heat olive oil in a large Dutch oven or pot over medium heat. Add ground beef, breaking it up with a wooden spoon. Cook until browned, about 6-8 minutes. Drain excess fat for a lighter chili. The beef’s savory aroma sets the stage.
- Sauté Veggies: Add onion, bell pepper, jalapeño, and garlic to the pot. Cook, stirring occasionally, until softened, about 5 minutes. The veggies release sweet and spicy notes, building flavor.
- Add Spices: Sprinkle in chili powder, cumin, smoked paprika, oregano, salt, and pepper. Stir for 1 minute to toast spices, unlocking their warm, earthy scents.
- Combine Wet Ingredients: Stir in tomato paste, cooking for 1 minute to deepen flavor. Add crushed tomatoes, diced tomatoes, beef broth, and brown sugar (if using). Scrape up browned bits from the pot’s bottom for extra richness.
- Add Beans: Stir in kidney and black beans. Bring to a simmer, then reduce heat to low. Cover and cook for 30 minutes, stirring occasionally. The chili thickens, melding flavors into a cozy, hearty stew.
- Taste and Adjust: Taste for seasoning, adding salt, pepper, or more chili powder for heat. Simmer uncovered for 5-10 minutes if you prefer a thicker texture.
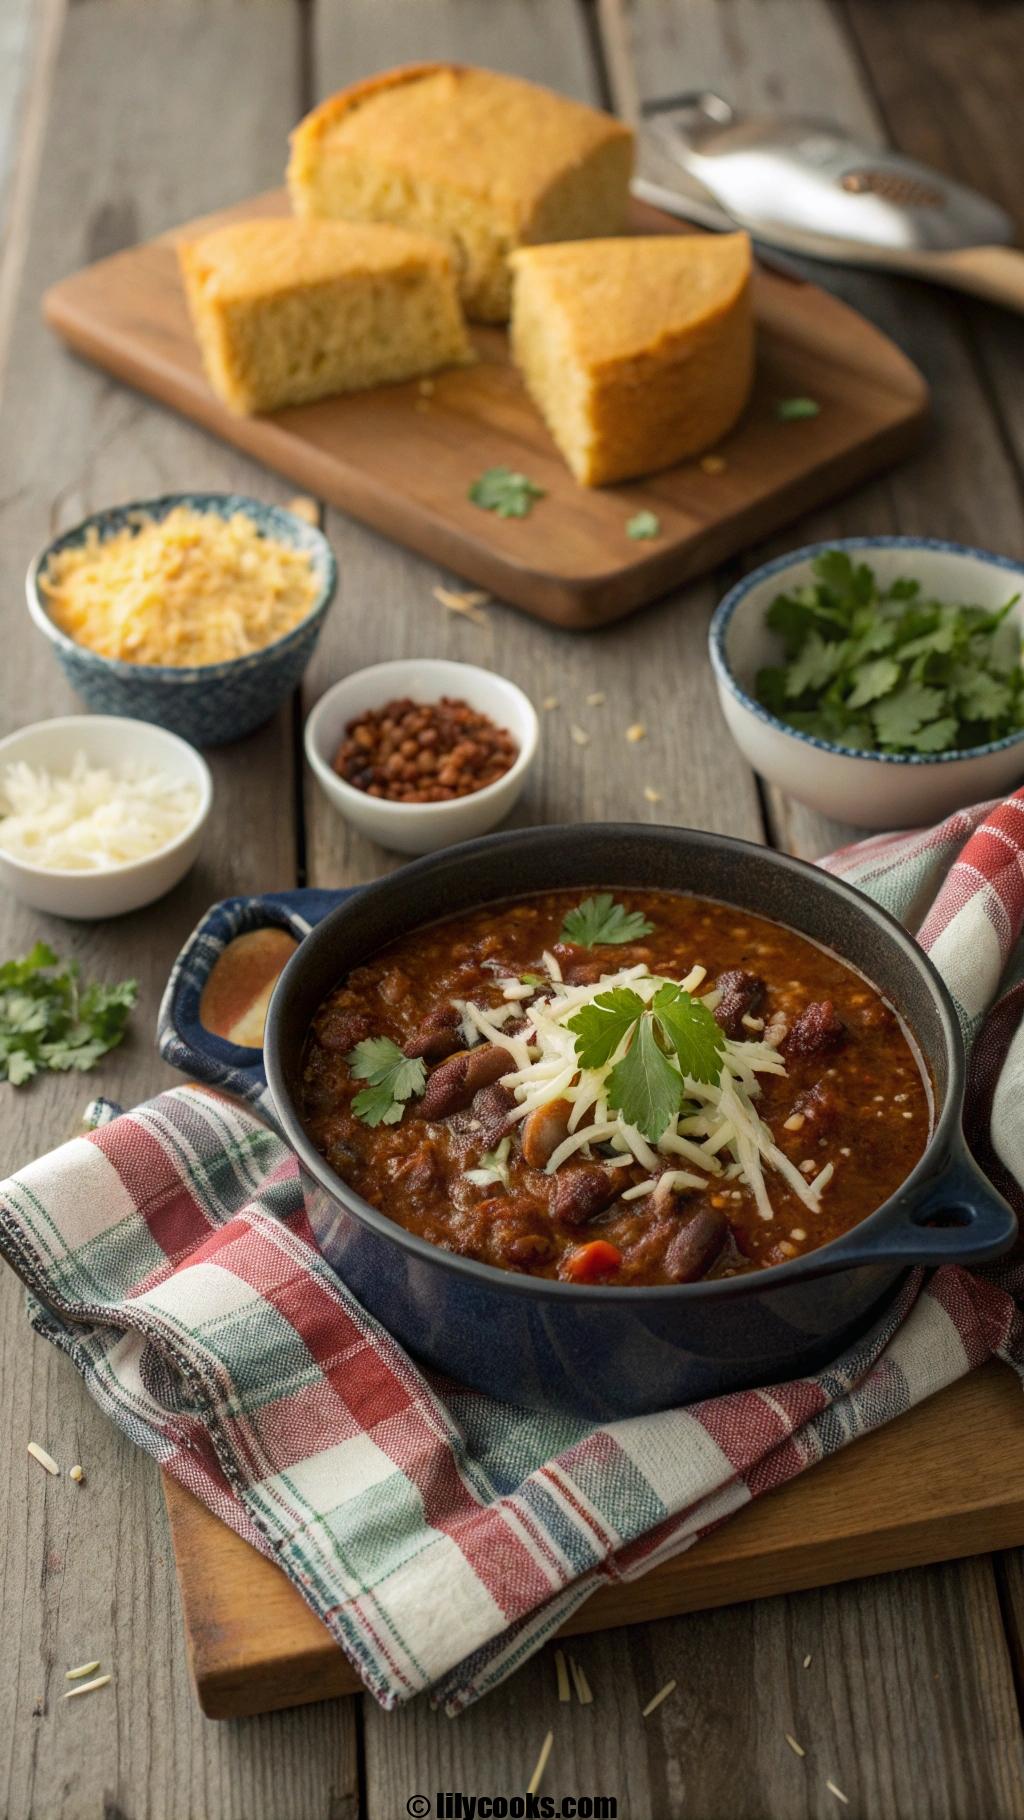
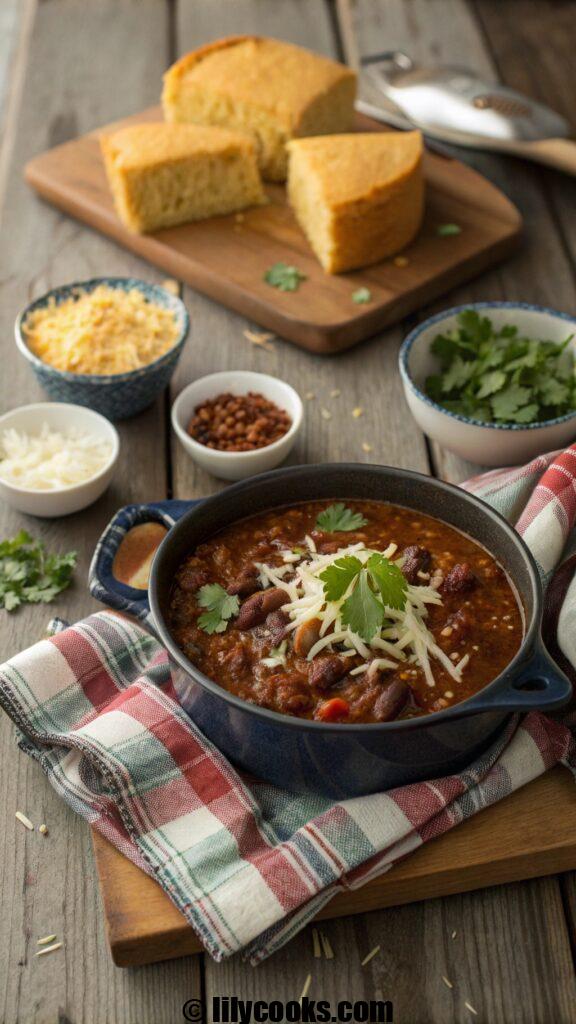
- Serve Hot: Ladle into bowls and top with your favorite garnishes like cheddar, sour cream, or cilantro. The creamy toppings balance the chili’s bold spices.
Tips for Success
- Don’t Skip Toasting Spices: Heating spices in oil enhances their flavor, giving the chili depth.
- Control the Heat: Adjust jalapeño seeds or chili powder to suit your spice tolerance.
- Let It Simmer: Longer simmering (up to 1 hour) intensifies flavors but isn’t required.
- Taste as You Go: Adjust salt and spices before serving for a balanced dish.
- Use a Heavy Pot: A Dutch oven retains heat, ensuring even cooking and rich texture.
Serving Suggestions

Serve this chili with warm cornbread for a classic pairing, or scoop it over baked potatoes for a hearty meal. For a lighter option, pair with a crisp green salad dressed with lime vinaigrette. Top with shredded cheddar and a dollop of sour cream for creaminess, or add avocado slices for a buttery contrast.
For gatherings, set up a chili bar with toppings like diced onions, jalapeños, and crushed tortilla chips for guests to customize. Present in rustic bowls with a sprig of cilantro for a pop of color.
Storage Tips
- Room Temperature: Let chili cool for no more than 2 hours before storing.
- Refrigeration: Store in an airtight container for up to 4 days. Reheat on the stove or microwave, adding a splash of broth if thickened.
- Freezing: Freeze in portioned containers or freezer bags for up to 3 months. Thaw overnight in the fridge before reheating. The chili’s flavors deepen over time, making leftovers even tastier.
FAQs
Can I make this chili vegetarian?
Yes, swap ground beef for plant-based meat or extra beans like pinto or lentils. Use vegetable broth instead of beef.
What can I substitute for jalapeño?
Use green bell pepper for no heat or a pinch of cayenne for spice without chunks.
Can I make this in a slow cooker?
Absolutely! Brown beef and sauté veggies first, then transfer to a slow cooker with remaining ingredients. Cook on low for 6-8 hours or high for 3-4 hours.
How do I thicken my chili?
Simmer uncovered for 10-15 minutes or mash some beans against the pot’s side for natural thickness.
Can I use ground turkey instead of beef?
Yes, ground turkey works well but may need extra seasoning for depth. Add a splash of Worcestershire sauce for umami.
Conclusion
This hearty chili recipe is your ticket to cozy, flavorful meals that bring people together. Its bold spices and rich textures make every bite a delight. Try it tonight, share it with loved ones, and let us know how it turned out in the comments! Happy cooking!
crisp cucumber and beetroot salad recipe
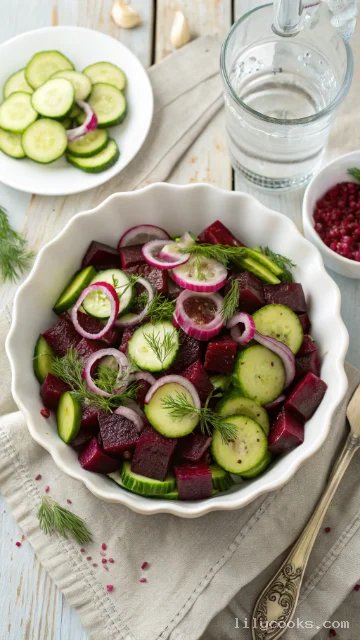
This crisp cucumber and beetroot salad is the epitome of a perfect side dish. It delivers a delightful contrast of textures, from the shattering crunch of the cucumber to the tender bite of the beetroot. The flavor profile is a harmonious blend of earthy and sweet, balanced by the sharp tang of a zesty vinaigrette. It is incredibly easy to prepare, requiring minimal cooking and no complicated techniques. This salad is a fantastic make-ahead option as the flavors meld and deepen beautifully over time. It is also naturally vegan and gluten-free, making it a crowd-pleaser for any occasion. This recipe is about pure, unadulterated flavor and effortless elegance.
Ingredients
- 2 large cucumbers (English or Persian, about 1 lb), thinly sliced. English cucumbers are perfect because they have a thinner skin and fewer seeds, ensuring a crisp, water-rich crunch.
- 3 medium-sized fresh beetroots (about 1 lb), roasted or boiled. Roasting brings out their natural sweetness and concentrates their earthy flavor.
- 1/2 red onion, very thinly sliced. Red onion provides a sharp, pungent bite that cuts through the sweetness and adds another layer of crunch.
- 1/4 cup fresh dill, finely chopped. Dill has a bright, anise-like flavor that perfectly complements the earthiness of the beetroot and the freshness of the cucumber.
- 1/4 cup extra virgin olive oil. The fruity, peppery notes of a good-quality olive oil form the base of a luxurious dressing.
- 3 tablespoons apple cider vinegar (or white wine vinegar). The acidity is crucial to balance the sweetness of the beetroot and brighten the entire dish.
- 1 tablespoon fresh lemon juice. Fresh lemon juice adds a vibrant, zesty kick that enhances all the other flavors.
- 1 teaspoon Dijon mustard. This acts as an emulsifier for the dressing and adds a subtle, warm spice.
- 1 teaspoon honey or maple syrup. A touch of sweetness helps to round out the sharpness of the vinegar and mustard.
- 1/2 teaspoon salt, or to taste. Salt is essential to draw out the natural juices and enhance all the flavors.
- 1/4 teaspoon freshly cracked black pepper. Fresh pepper adds a gentle warmth and a final layer of complexity.
Instructions
- Prepare the Beetroot: If you haven't already, roast or boil the beetroots. To roast, wrap them in foil with a drizzle of oil and bake at 400°F (200°C) for 45–60 minutes, or until tender. To boil, place them in a pot of salted water and simmer for 30–40 minutes. Let them cool completely, then peel and slice into thin half-moons or matchsticks. Pro Tip: Wearing disposable gloves will prevent your hands from getting stained!
- Prepare the Cucumber and Onion: While the beetroot cools, prepare the other vegetables. Thinly slice the cucumbers into rounds or half-moons. Place them in a large colander, sprinkle with a little salt, and let them sit for 10 minutes. This step draws out excess water, ensuring your salad stays crisp. Gently pat them dry with a paper towel.
- Make the Zesty Dressing: In a small bowl or a jar with a tight-fitting lid, combine the extra virgin olive oil, apple cider vinegar, fresh lemon juice, Dijon mustard, honey or maple syrup, salt, and pepper. Whisk vigorously until emulsified, or shake the jar until the dressing is well combined and creamy.
- Assemble the Salad: In a large mixing bowl, combine the sliced beetroot, the dried cucumber slices, and the thinly sliced red onion. Pour the dressing over the top and add the finely chopped fresh dill.
- Toss and Marinate: Gently toss all the ingredients together until everything is beautifully coated in the dressing. For the best flavor, let the salad marinate in the refrigerator for at least 30 minutes. This allows the flavors to meld and the vegetables to soften slightly while retaining their crunch.