

Dive into the vibrant world of Mexican cuisine with this authentic Mexican rice recipe! This dish bursts with rich tomato flavor, subtle spices, and a fluffy texture that pairs perfectly with tacos, enchiladas, or grilled meats.
It’s a crowd-pleaser that’s simple to make, budget-friendly, and brings a festive touch to any meal. You’ll love how this recipe transforms pantry staples into a colorful, aromatic side dish that’s sure to impress.
Recipe Overview

This Mexican rice, also known as arroz rojo, delivers a savory, slightly tangy taste with a hint of warmth from cumin and chili powder. Its fluffy grains soak up the robust tomato base, creating a satisfying bite. Ready in under 40 minutes, it’s perfect for weeknight dinners or meal prep.
Preparation Time: 10 minutes
Cooking Time: 25 minutes
Total Time: 35 minutes
Servings: 4-6
Ingredients List
- 1 cup long-grain white rice: Choose long-grain for fluffy, separate grains; rinse to remove excess starch.
- 2 tablespoons vegetable oil: Neutral oil ensures the rice fries lightly without overpowering flavors.
- 1/2 medium onion, finely chopped: Adds sweet, savory depth; yellow or white onions work best.
- 2 cloves garlic, minced: Fresh garlic infuses a warm, aromatic note.
- 1 1/2 cups chicken or vegetable broth: Use low-sodium for control over seasoning; veggie broth for vegetarian option.
- 1 cup tomato sauce: Provides rich, tangy flavor; opt for plain, unseasoned sauce.
- 1 teaspoon ground cumin: Earthy spice enhances authenticity.
- 1/2 teaspoon chili powder: Adds mild warmth; adjust for spice preference.
- 1/2 teaspoon salt: Enhances all flavors; taste and adjust as needed.
- 1/4 cup frozen peas or diced carrots (optional): Adds color and subtle sweetness.
- Fresh cilantro, chopped (for garnish): Brightens the dish with a fresh, herbaceous pop.
Step-by-Step Instructions
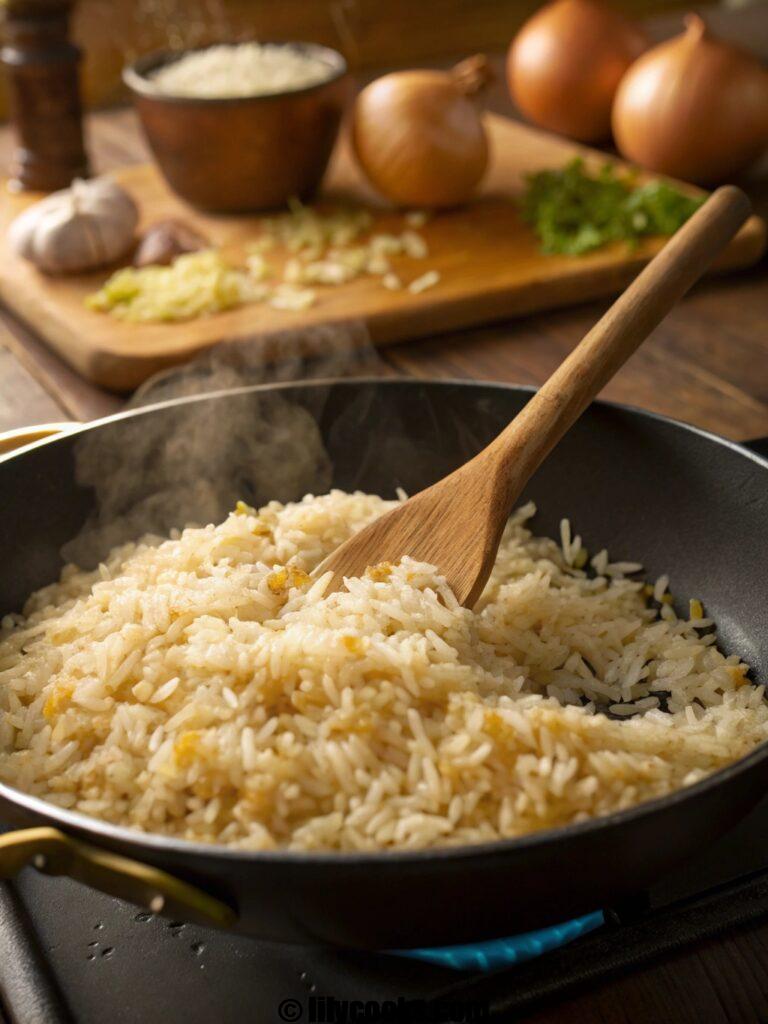
- Rinse the rice: Place rice in a fine-mesh strainer and rinse under cold water until water runs clear, about 1-2 minutes. This removes starch for fluffier rice. Drain well.
- Toast the rice: Heat oil in a large skillet over medium heat. Add rice and stir constantly for 3-5 minutes until golden. Toasting enhances nutty flavor and prevents mushiness. Image generation prompt: A skillet of golden-toasted rice with a wooden spoon stirring, steam rising, rustic kitchen setting.
- Sauté aromatics: Add onion and garlic to the skillet. Cook for 2-3 minutes, stirring, until onion softens and garlic is fragrant. This builds a savory base.
- Add liquids and spices: Stir in broth, tomato sauce, cumin, chili powder, and salt. Bring to a boil, then reduce heat to low. Cover and simmer for 15-20 minutes, undisturbed, until liquid is absorbed.
- Add vegetables (optional): If using peas or carrots, stir them in during the last 5 minutes of cooking. They’ll cook just enough to stay vibrant.
- Fluff and rest: Remove from heat and let sit, covered, for 5 minutes. Fluff with a fork to separate grains. Garnish with cilantro before serving.
Tips for Success
- Don’t skip rinsing: Rinsing prevents sticky rice and ensures a light texture.
- Use a tight-fitting lid: Trapping steam is key for even cooking.
- Avoid peeking: Lifting the lid releases steam, which can lead to unevenly cooked rice.
- Adjust spice: Taste before serving and add more chili powder for extra heat.
- Toast carefully: Watch the rice while toasting to avoid burning; medium heat works best.
Serving Suggestions

Serve this Mexican rice alongside chicken fajitas, beef barbacoa, or veggie enchiladas for a complete meal. Scoop it into burrito bowls with black beans, avocado, and salsa for a fresh twist. For a stunning presentation, pack rice into a small bowl, invert onto a plate, and garnish with a cilantro sprig. Pair with a refreshing margarita or hibiscus agua fresca for a festive vibe.
Storage Tips
- Room temperature: Let cool completely and store within 2 hours to prevent spoilage.
- Refrigeration: Store in an airtight container for up to 4 days. Reheat in a skillet with a splash of broth to revive fluffiness.
- Freezing: Freeze in portioned containers for up to 3 months. Thaw overnight in the fridge and reheat gently.
FAQs
Can I use brown rice instead of white rice?
Yes, but brown rice requires more liquid (about 2 cups broth) and a longer cooking time (40-50 minutes). Check package instructions.
What can I substitute for tomato sauce?
Blend canned diced tomatoes or use 1/2 cup tomato paste mixed with 1/2 cup water for a similar flavor.
Is this recipe spicy?
It’s mildly spiced. For less heat, reduce chili powder to 1/4 teaspoon. For more, add a pinch of cayenne.
Can I make this in a rice cooker?
Yes! Toast rice and sauté aromatics in a skillet, then transfer to a rice cooker with remaining ingredients and cook per your model’s settings.
How do I prevent soggy rice?
Rinse rice thoroughly, use the correct liquid ratio, and avoid lifting the lid during cooking.
Conclusion
This Mexican rice recipe is your ticket to a vibrant, flavorful side dish that’s easy to whip up and impossible to resist. Give it a try, share it with loved ones, and let the fiesta begin! Drop a comment below to share your results or tag us on social media—I can’t wait to see your creations.
cheddar stuffed meatloaf morsels recipe

These Cheddar Stuffed Meatloaf Morsels bring together everything you love about meatloaf in a fun, bite-sized package. The outside turns beautifully caramelized with a tangy glaze while the inside stays incredibly juicy and tender-3. Sharp cheddar cheese melts into a gooey, savory center that contrasts perfectly with the seasoned beef-3-7. The recipe comes together in about 35 to 40 minutes total, making it perfect for busy evenings when you want something satisfying without spending hours in the kitchen-1-7. Best of all, these morsels are endlessly adaptable—swap the cheese, change up the seasonings, or turn them into a full dinner with your favorite sides.
Ingredients
- 1 lb (450 g) ground beef (80/20 or 85/15 lean) – The fat content matters here. An 80/20 blend gives you the juiciest, most flavorful morsels. Leaner beef can turn dry, so stick with this ratio for the best texture.
- ½ cup breadcrumbs (plain or panko) – Breadcrumbs act as a binder and help retain moisture. Panko creates a slightly lighter texture, while plain works just as well.
- ⅓ cup milk – Milk soaks into the breadcrumbs to keep the meat tender and moist.
- 1 large egg – The egg binds everything together so your morsels hold their shape during baking.
- ½ small onion, finely grated or minced – Grated onion melts into the meat, adding flavor without chunky bits. If you prefer a more traditional texture, finely diced works too.
- 2 cloves garlic, minced – Fresh garlic brings a warm, aromatic depth that powder just can’t match.
- 1 tbsp Worcestershire sauce – This adds that signature savory umami punch that defines great meatloaf.
- 1 tsp salt
- ½ tsp black pepper
- 1 tsp smoked paprika (optional) – A little smoked paprika adds a subtle, smoky warmth that pairs beautifully with beef.
- 2 tbsp ketchup – Ketchup adds a touch of sweetness and tang right into the meat mixture
Instructions
Step 1: Preheat and PrepPreheat your oven to 375°F (190°C)-3-7. Line a baking sheet with parchment paper or lightly grease a 12-cup muffin tin-7-3. A muffin tin helps the morsels hold their round shape and reduces the chance of cheese leakage-1.
Step 2: Soak the Breadcrumbs (Optional but Recommended)In a small bowl, combine the breadcrumbs and milk. Let them sit for about 5 minutes until the breadcrumbs soften-9-12. This step ensures extra moisture in every bite.
Step 3: Mix the Meatloaf MixtureIn a large bowl, combine the ground beef, soaked breadcrumbs (or dry breadcrumbs plus milk), egg, grated onion, minced garlic, Worcestershire sauce, salt, pepper, smoked paprika (if using), and ketchup-7-8. Use your hands or a spatula to mix until everything is just combined-8. Here’s the golden rule—do not overmix. Overworking the meat activates proteins that make the morsels dense and tough instead of tender and juicy-7-9. Mix just until the ingredients come together, then stop.
Step 4: Shape and StuffDivide the meat mixture into 12 equal portions (about 2 tablespoons each)-8-. Take one portion and flatten it into a small disc in the palm of your hand. Place a cheddar cube in the center--8. Gently fold the meat around the cheese, sealing it completely. Roll it into a smooth ball, making sure there are no cracks or thin spots where cheese could escape-1-. Repeat with the remaining meat and cheese cubes. Place each morsel on your prepared baking sheet or into the muffin tin cups.
Step 5: Make and Apply the GlazeIn a small bowl, whisk together the ketchup, brown sugar, apple cider vinegar, and garlic powder until smooth-8. Brush or spoon the glaze generously over the top of each meatloaf morsel-8. This glaze will caramelize in the oven, giving you a beautiful glossy finish and a sweet-tangy flavor boost-8.
Step 6: Bake to PerfectionBake the morsels for 20 to 25 minutes, or until the internal temperature reaches 160°F (71°C)-3-8. A meat thermometer is your best friend here—it takes the guesswork out of doneness-1. The morsels should be golden brown on the outside with the glaze nicely caramelized.
Step 7: Rest and ServeLet the morsels rest for 5 minutes before serving-8-9. This short rest allows the juices to redistribute throughout the meat, keeping every bite moist and flavorful. Garnish with fresh chopped parsley if desired-7.