

Craving a bakery-style treat that’s buttery, flaky, and filled with creamy goodness? This cream cheese Danish recipe is your ticket to homemade pastry heaven! Perfect for breakfast, brunch, or a sweet snack, these golden pastries are surprisingly easy to make and endlessly customizable.
With a rich cream cheese filling and a crisp, puff pastry crust, they’re sure to steal the show. Let’s bake some magic!
Recipe Overview

Preparation Time: 20 minutes
Cooking Time: 20 minutes
Total Time: 40 minutes
Servings: 8 Danishes
Ingredients List
- 1 sheet puff pastry (thawed, store-bought): Provides a flaky, buttery base that saves time without sacrificing quality.
- 8 oz cream cheese (room temperature): Creates a smooth, tangy filling; room temperature ensures easy mixing.
- 1/4 cup granulated sugar: Adds sweetness to balance the cream cheese’s tang.
- 1 large egg yolk (room temperature): Binds the filling for a creamy, rich texture.
- 1 tsp vanilla extract: Enhances the filling with warm, aromatic notes.
- 1 tsp lemon zest: Brightens the filling with a fresh, citrusy pop.
- 1 tbsp all-purpose flour: Thickens the filling slightly for perfect consistency.
- 1 egg (for egg wash): Gives the pastry a glossy, golden finish.
- 1 tbsp water (for egg wash): Thins the egg for an even wash.
- 1/2 cup powdered sugar: Forms the base of a sweet, drizzly icing.
- 1-2 tbsp milk: Thins the icing for a smooth, pourable texture.
- Optional: 1/4 cup fruit preserves (e.g., raspberry or blueberry): Adds a fruity swirl for extra flavor and visual appeal.
Note: Room-temperature cream cheese and egg yolk blend smoothly for a lump-free filling. High-quality puff pastry ensures maximum flakiness.
Step-by-Step Instructions

- Preheat and Prep: Preheat oven to 400°F (200°C). Line a baking sheet with parchment paper. Thaw puff pastry according to package instructions (about 30 minutes at room temperature). Tip: Keep pastry cold but pliable to prevent tearing.
- Make the Filling: In a medium bowl, beat cream cheese, granulated sugar, egg yolk, vanilla extract, lemon zest, and flour with a hand mixer until smooth and creamy, about 2 minutes. Tip: Ensure cream cheese is soft to avoid lumps in the filling.
- Cut the Pastry: Unfold puff pastry on a lightly floured surface. Roll gently to smooth creases, then cut into 8 equal squares (about 4×4 inches each). Tip: Use a sharp knife or pizza cutter for clean edges.
- Shape the Danishes: Place squares on the baking sheet. Spoon 1-2 tbsp of filling into the center of each square. If using preserves, add a small dollop on top. Fold corners toward the center, pressing gently to seal, or shape as desired (e.g., pinwheels). Tip: Don’t overfill to prevent leakage during baking.
- Apply Egg Wash: Whisk egg with 1 tbsp water. Brush lightly over pastry edges for a golden shine. Tip: Avoid getting egg wash on the filling to keep it creamy.
- Bake: Bake for 18-20 minutes until puffed and golden brown. Let cool on the baking sheet for 5 minutes, then transfer to a cooling rack. Tip: Rotate the tray halfway through for even browning.
- Make the Icing: Whisk powdered sugar with 1-2 tbsp milk until smooth. Drizzle over cooled Danishes. Tip: Adjust milk for desired icing thickness—thicker for piping, thinner for drizzling.
Tips for Success
- Keep Pastry Cold: Work quickly with puff pastry to maintain its flaky layers; refrigerate if it softens too much.
- Don’t Overfill: Too much filling can leak out, so stick to 1-2 tbsp per Danish.
- Test for Doneness: Look for a deep golden color and puffed layers to ensure the pastry is fully baked.
- Customize Flavors: Add fruit preserves, chocolate chips, or almond extract to the filling for variety.
- Smooth Icing: Sift powdered sugar before mixing to avoid lumps in the glaze.
Serving Suggestions

Storage Tips
- Room Temperature: Store Danishes in an airtight container at room temperature for up to 1 day to maintain flakiness.
- Refrigeration: Keep in an airtight container in the fridge for up to 4 days. Reheat in a 350°F oven for 5 minutes to crisp up.
- Freezing: Freeze baked, unglazed Danishes in a single layer, then transfer to a freezer bag for up to 2 months. Thaw at room temperature and glaze before serving. Tip: Freeze unshaped pastry squares with filling for quick assembly later.
FAQs
Can I use homemade puff pastry?
Yes, but store-bought saves time and yields consistent results. Homemade pastry requires extra chilling time.
Can I make these ahead?
Assemble Danishes, refrigerate unbaked for up to 24 hours, then bake fresh. Glaze after cooling.
What if I don’t have lemon zest?
Substitute with orange zest or skip it; vanilla extract alone still gives a lovely flavor.
Can I use low-fat cream cheese?
Yes, but full-fat cream cheese provides a richer, creamier texture for the best results.
How do I prevent soggy pastry?
Bake on parchment paper and avoid overfilling. Ensure the oven is fully preheated for crisp layers.
Conclusion
These cream cheese Danishes are a delightful blend of flaky, buttery pastry and creamy, tangy filling that’s sure to brighten any morning or gathering. Whip up a batch, savor the compliments, and share your pastry masterpieces with us in the comments or on social media. Happy baking!
easy one pot spinach tomato pasta recipe for busy nights
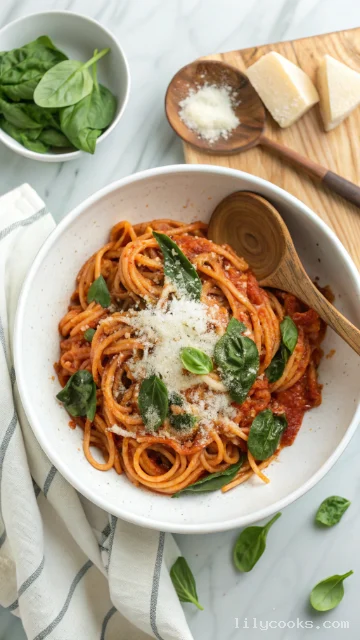
This one-pot pasta is a symphony of textures and tastes. The pasta cooks directly in the tomato juices and broth, absorbing every bit of flavor, resulting in a deeply savory and tender noodle. The cherry tomatoes burst open, creating a rustic, chunky sauce that is both sweet and acidic. The fresh spinach wilts perfectly into the mix, adding a pop of green and a subtle, mineral-rich note. Finished with a sprinkle of Parmesan cheese, this dish is creamy without being heavy, and comforting with a fresh, zesty finish. It is a complete meal, ready in under 30 minutes, proving that quick cooking does not have to compromise on quality or taste.
Ingredients
- 12 ounces (340g) dried short pasta: (like penne, rigatoni, or fusilli). The ridges and curves of short pasta are excellent for catching the chunky tomato sauce.
- 4 cups (960ml) vegetable or chicken broth: The liquid gold that infuses the pasta with flavor as it cooks. Use a good-quality broth for the best taste.
- 1 (28-ounce/800g) can whole peeled tomatoes: Crush them with your hands as you add them to the pot. They break down beautifully into a rich sauce. For a brighter flavor, you can also use 2 pints of fresh cherry tomatoes.
- 5 ounces (140g) fresh spinach: Wilted into the hot pasta, it adds a boost of nutrients and a lovely color contrast.
- 1 medium yellow onion, finely chopped: Provides a sweet, savory base for the sauce.
- 4 cloves garlic, minced: Essential for that aromatic backbone.
- 1/4 cup (60ml) extra-virgin olive oil: For sautéing and adding a rich, fruity flavor.
- 1 teaspoon dried oregano: Adds a classic, earthy Italian note.
- 1/2 teaspoon red pepper flakes: For a gentle warmth. Omit if you prefer a milder dish.
- Salt and black pepper: To taste, enhancing all the other flavors.
- 1/2 cup (50g) grated Parmesan cheese: For a salty, nutty finish. Freshly grated is always best for melting.
Instructions
- Sauté the Aromatics: Place your large, deep skillet or Dutch oven over medium heat and add the olive oil. Once the oil shimmers, add the chopped onion and a pinch of salt. Cook, stirring occasionally, for about 5 minutes, until the onion has softened and become translucent. Add the minced garlic, oregano, and red pepper flakes, and cook for another minute until fragrant. This step builds the flavorful foundation of your sauce.
- Add the Tomatoes and Broth: Pour the canned tomatoes into the pot, crushing them with your hands as you go to break them into smaller pieces. Add the vegetable broth and season with a good crack of black pepper. Stir everything together, scraping up any browned bits from the bottom of the pan.
- Cook the Pasta: Stir in the dried pasta, ensuring it is mostly submerged in the liquid. Bring the mixture to a boil, then reduce the heat to a steady simmer. Cook uncovered, stirring frequently to prevent the pasta from sticking, for about 10-12 minutes, or until the pasta is al dente and most of the liquid has been absorbed. The starches released from the pasta will help thicken the sauce.
- Wilt the Spinach: Turn off the heat. Add the fresh spinach to the pot in handfuls, stirring it into the hot pasta. The residual heat will wilt the spinach in about 1-2 minutes. You will see its vibrant green color deepen as it softens and melds with the sauce.
- Finish and Serve: Stir in the grated Parmesan cheese until it is fully melted and the sauce becomes slightly creamy. Taste and adjust the seasoning with salt and pepper. Let the pasta rest for a couple of minutes before serving to allow the flavors to marry.